19.07.2016
Unusual ride
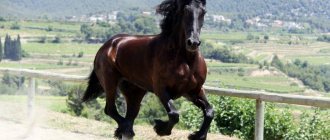
Different breeds of horses have different types of gait, which are called gaits. They differ from each other in the way they move and position their limbs during movement, and in the speed of movement. And among all types of gaits, gallop is considered the fastest. The French interpret the term “gait” in Russian as “gait”. In addition to divisions into the variety of such gaits, each type of gait also has subspecies. Only an experienced horse breeder or rider who has been in contact with horses for a long time will be able to remember all these classifications and independently determine each of them.
Basic horse gaits
A little more theory. The three main gaits are walk, trot and canter. Spare me the scientific characterization of the rearrangement of legs at each gait. The horses know this even without us.
But this does not mean that you should not carefully monitor the rhythm and the entire process of movement as a whole. Try to determine how the tired, sluggish trot of a horse under an inexperienced rider differs from the high, sweeping and springy trot of a skilled rider. This is noticeable in the horse from the tips of the ears to the tail!
Three gaits are not everything. There are a number of nuances, depending on whether the rider and horse are moving smartly and collectedly or slowly and freely. So, in a step, a “free” and “collected” step are distinguished.
- At the same time, free walking means the type of movement when the horse walks as if on its own, without obvious intervention from the rider.
- A collected walk is called when the horse is ready to move, truly “holds” its head and tail, and walks with a high, springy step.
When trotting, the stride lengthens, the order of rearrangement of the legs and, above all, the force of the push (the rate of passage of a normal section of the path) changes through a distinct acceleration of the normal trot to an extended one. But even here the difference between collected and extended trot is revealed. True, the extended trot is more suitable for rough terrain, while in the arena it is better to ride at a collected trot. But even in the arena, from time to time the horse is allowed to trot freely for relaxation.
- If the rider remains firmly seated in the saddle at each trot pace of the horse, then such a seat is called “training” or (less often) “German”.
- If, after each trot pace, the rider seems to stand up in the stirrups, then this is called a “light” trot (or “English” seat).
There are also three options in gallop: the pace increases (at the same time the speed also increases) from the dressage canter (short gallop) to the working gallop and to the extended gallop. While the walk and trot of the right and left legs are basically the same, in the canter there is a left and right canter. These names correspond to the “leg” with which the horse starts off.
- If the horse starts from the front left (from the inside leg in relation to the center of the arena), they speak of moving “from the left leg”. And vice versa.
- If the horse starts from the outside leg (in relation to the center of the arena), then they speak of a counter canter.
Tempo is the continued rhythm of a step sequence. So the horse takes approximately 100-130 steps per minute. This rhythm can be slowed down or speeded up. By the term tempo, riders do not mean a faster beat, but the different intensity with which they walk in one gait (for example, normal or shortened trot). It is expressed in the height and width of an individual step. At the same speed, the step can be free and extended or collected, that is, shortened.
Kinds
Horses have different ways of walking: trot, amble, gallop. The latter, in turn, is divided into several types.
Manezhny
The manege stroke also has other names - short, or short-gallop. This is the slowest gallop, during which the horse only warms up for faster movement. It is no coincidence that this type is called a dressage type: it is used if the horse needs to move quickly in a limited space.
Find out which horses are the fastest in the world.
Field
The field gallop is called the hunting gallop, or canter. This is a faster type of gait than the dressage gait. Used in large spaces, in dressage or show jumping, where it is possible to accelerate. The horse's movements are more extended, frisky, but not tiring.
This type of running is used to learn how to stay in the saddle. But professional jockeys do not use it at horse races.
Quarry (fast gallop)
The quarry is the fastest pace of movement of the horse. With it the swings of the limbs are very large.
Did you know? The length of a horse's stride in a quarry can be
3 times greater than the length of the animal's body.
At the fast pace of the quarry, the speed can reach 20 m/s. Only trained and warmed animals can use it for a long time, because it is the most tiring type of running. The heart and lungs are under a lot of stress, and as a result, the animal may lack oxygen.
This is exactly what is called “to drive a horse” when the horse develops pulmonary emphysema from excessive stress. It is impossible to improve the horse’s health after this; normal respiratory function is no longer restored.
Horse control commands
Now about the teams. They consist of two parts, professionally speaking the “preliminary” and “executive” teams. Between them you are given a short period of time so that you and your horse prepare to carry out the command. It is always clear from the preliminary team what the executive team will be like.
- At the command “Group, march,” the group begins to move at a step, simultaneously, and not like cars at a traffic light.
- “Trot, march” and “Gallop, march” indicate the transition to the next gait.
- “Short trot, march” or “Short stride, march” means the opposite.
- And finally, the command “Group, stop” stops the movement.
Of course, horses can be raised to a gallop from a walk, stopped from a trot (even from a gallop). You can even lift a standing horse into a gallop, though only a single rider, not a group.
Commands and sends
Learning how to properly ride a horse necessarily includes knowing the cues and certain commands. Let's take a closer look.
- The command to move forward is to move the body forward, tense the pelvis, press the legs immediately behind the girth, and give up the reins.
- The command “stand” - we strain the pelvic muscles, pressing ourselves into the saddle, we move the body back, calmly, without jerking, we select the reins towards ourselves.
- Turn to the left - the body is straight or in the direction of movement, we select the left rein, give the right one a little, the right leg presses the side immediately behind the girth.
- Turn to the right - the body is straight or in the direction of movement, we select the right rein, give the left a little, the right leg presses the left side.
- The message is “quickly” - we push the horse with our legs immediately behind the girth, pushing the body forward.
- Turning on the spot - we select the reins in the direction of movement, push the leg immediately behind the girth on the side of the direction of movement, press the opposite leg at a palm's distance from the girth.
- The movement is “backward” - we press the pelvis to the saddle, we move the body back, slowly and calmly, without jerking, we select the reins for ourselves, the legs should work immediately behind the girth.
To properly control your horse, learn all the commands.
Getting started: how to get started?
Remember: before we began to explain to you the theoretical positions of landing and sending, you were sitting in the arena on a horse, holding the reins correctly in your hand, the harnesses were not twisted - and were waiting for everything to begin.
Whether a person is working out in the arena alone or in a group - how does he get going?
It’s very simple: the lower back is arched, at the same time both legs are pressed near the girth, the reins are slightly released. Perhaps the horse will actually start moving - along with the others, just for company. And if not? You try again - and again to no avail. Do not despair! This is not a protest or evidence of its exceptional evil.
Somehow she recognized the newcomer in you: the three messages have not yet been agreed upon. Perhaps, expecting the horse to start moving, you leaned forward. Or even tightened the stomach. Or they “let go” of the reins (instead of first picking them up and then loosening them by 1 - 2 cm).
Luckily, you have a whip. The next time you try, lightly hit the horse on the shoulder with it. Be determined, the whip will not break! And no horse can stay in one place forever. Please do not be nervous, even if the coach is not in the best mood today. While remaining calm, remember that you should:
- sit up straight without hunching over;
- Tighten your lower back, bend slightly, pull the reins slightly;
- simultaneously press both legs (if necessary, even kick the horse’s body) and again release the reins a little. Perhaps help with a whip.
Well, you see. You should also practice moving your horse. And then one day everything will happen exactly as smoothly and naturally as was described at the very beginning.
A woman dreamed of a horse
Big - achieve success, increase your well-being.
A running herd prophesies a rapid rise up the career ladder, victory in some important matter, or the fulfillment of a cherished dream.
For a woman, a dead horse in a dream is a bad sign, warning of separation from a partner, an outdated relationship. Another interpretation is huge losses that will be difficult to cope with.
Skinny and hungry - disagreements with loved ones due to financial situation, emotional turmoil, unpleasant news from afar.
An unmarried woman dreams of a horse grazing in a meadow with a foal - a long separation from a loved one.
Bites the dreamer - deceit, unexpected betrayal of a loved one.
Buying a young animal is a meeting with a person who was considered long lost
Old - significant losses await.
The horse attacks - quick attacks from others.
Feeding - additional income, or making a small profit.
Riders on horses - easy success in the near future.
For a married woman, riding a horse means possible betrayal.
How to use a whip?
Let me say a few more words about the whip and its use. The fact that for the arena and for training riding you need a long whip was said at the very beginning. Now you gradually understand why it is long: the whip should reach the horse’s croup so that you don’t have to let go of the reins.
At the very beginning, you can get by with a shorter whip; and with it, as a last resort, you can hit the horse on the shoulder. The deeper you become familiar with the processes of movement, the more differentiated you use the whip. And one more thing: the blow must be sharp and strong enough, and at the same time you must not lose control of the reins. It makes no sense to first shift the reins to the left hand and then try to reach the horse’s croup with a short whip. That's when the horse will definitely take off. This means that control over the horse is weakened: the connection with the horse's mouth is lost.
Impact by reason
The rein is necessary for stopping and turning the horse and serves as the main means of control. In addition, it is he who is the most important connecting center between the rider and the horse. The rein is attached to the bit, which is located in the animal’s mouth, so the horse feels all its movements very well. Jerking, twitching and other unnecessary hand movements are not allowed here. Therefore, when it comes to commands, the basis is an important rule: good riding is the soft hands of the rider. Hands and forearms should always be relaxed.
The reins should not sag, but also not pull on the horse's mouth. Their correct position is such that the rider can feel the movements of the horse's head well, but does not constrain them. The effect of the rein depends on the type of headband and the cutting of the reins. There are several types of them. For a beginner, the English style is considered the best, when the reins are taken in a fist and passed between the thumb and little finger. The hands are held vertically, that is, with the thumbs up.
When controlling a horse with the reins, sudden movements are not allowed.
Horse movement at a walk
Focusing on the rhythm, quietly count the steps: 1,2, 1,2. You will feel the horse's body moving left and right. Do not “drum” your legs, but try to alternately press them on the horse’s body, in the area of the girth. This is called pushing. This should happen automatically - all the time you walk. Only in this case will the horse have the correct high and free stride, and you will actually move at a walk. Otherwise, you will encourage your horse to move in a way that has nothing to do with a sporting gait.
Can you feel the horse moving in your hips?
Balance this gentle sway with a gentle movement of your body. Your upper body should not sway. Don't rock back and forth with every step your horse takes. Not only does it look unsightly, but it also makes it harder for you to control the reins!
Horses nod their heads as they walk, some more, others less. Try as much as possible to break your horse of this habit. The horse should neither bump into the reins nor pull it out of your hands with each step.
Intermediate question: Have you forgotten that the legs should lie quietly next to the horse’s body in the girth area? And that you should pull your heels down and your toes up?
During the first two classes you will have plenty of time to take care of yourself. But then you have to start driving vigorously. It is necessary to ensure that the horse arches its back, then it will be more comfortable for you to sit. To do this, you need to know the language of the message. In horseman's language this is called “pushing”. If you move the reins (mainly the inside reins, the outside should “freeze”), pull on the reins and release it, and so on three, or even four times, while the horse walks along the long side of the arena. If the horse is chomping at the bit, it means you have trained it. This means that the natural connection with the horse's mouth is established: your horse is at least controlled by the reins.
In the end, there is a consolation: walking with a beautiful, free gait is not so easy - and experienced riders have a lot of worries before their horse learns to “put out its legs” correctly and begins to perform with a springy, sweeping step, as required by the management.
Where to begin?
Many people, even if they have a desire to learn how to ride a horse, are afraid of this type of leisure and sport. To get rid of complexes, it is better to visit specialized institutions where professional trainers teach horse riding.
"Golden Age"
Anyone can acquire horse riding skills; at any age, the skills will help increase physical activity and maintain natural physical fitness. Children learn skills especially quickly, but children's training requires the work of an experienced trainer to eliminate the rather high risk of injury.
You can achieve perfection and successfully participate in competitions even if you start training after 30 years. There are no age or physical restrictions for this type of amateur and professional sport. Depending on the skills acquired, riders can perform certain exercises. The easiest way to ride a horse is to walk (trot). This is quite enough for regular walks in the park and enjoyment. The rider can improve as needed.
What breed of horse is best for training?
Horseback riding as a culture developed among different peoples in parallel and was divided into two types: the use of horses without prior training and targeted methodological training of the horse, which ultimately facilitated the execution of the rider’s commands.
Getting to know the horse and emotional contact is an important learning point.
Eastern peoples typically use the first method; they practice riding bareback horses. This is also typical for Russia - on farms, in Cossack settlements, among riders who independently learned to control a horse. It is worth noting that those innate riders who intuitively know how to ride a horse adhere to unspoken rules for controlling the animal’s behavior, seating, and movements while riding.
Civilized European peoples and, as a consequence, the Austrian and German schools are characterized by the use of an artificial method, which has changed over many centuries and has come down to us in an aggregated form. Knowledge represents, in total, military skills, fashion requirements, and aristocratic behavior. At the same time, it cannot be said that the established rules are correct, indisputable and unambiguous. In equestrianism, everything is determined by the practice and purpose for which riding is used.
In our time, trainers also use elements or a complete methodology of artificial riding. Due to the serious training of the horse, when a beginner sits in the saddle, he can feel completely safe.
For this reason, the choice of horse breed does not matter. All training horses are trained in classical riding and calmly obey the instructor. As a rule, if basic precautions are taken during training, it is impossible to fall, and the horse behaves calmly and comfortably for the rider.
Stopping a horse on command
On the command “Group, stop!” riders stop their horses. The spacing between horses should remain the same as when moving (horse body). Stop commands are similar to those given when moving away. You should:
- straighten up and tense your lower back;
- Use both legs to squeeze the horse’s sides in the girth area;
- Pull both reins simultaneously and then loosen (repeat if necessary).
As you already know, by slightly loosening the reins at the start of the movement, you “stimulate” forward movement. Now you act in the same way - but pulling the reins more sharply until the horse stops. But do not lean back like a coachman and do not tear the reins: it is tightened by simultaneously turning your fists. If the horse does not stop, then the fist movement must be repeated; but act gently! Motto: In a tug of war, the horse is still stronger.
This holding of the horse to a stop is called a full stop. Don’t forget about voice commands, calm the horse. Only when the horse has stopped can the arms, body and legs be “relaxed”.
When stopping, the horse should stand on all four legs, the load on them is distributed evenly. The front and rear legs should be level. When you stop, you may think that the horse in front of you is larger than you. In reality, after the horse “brings” its hind legs under the body, its hindquarters appear to be lower. It is wrong to stop a horse by simply pulling on the reins; the legs must be pressed tightly against the horse's body.
Restraining the horse (switching to a slower gait) is carried out in the same way as stopping, but does not lead to a complete stop. Thus, “holding” or “full” stopping are different things, you must be able to get the horse to comply with both commands. Depending on the situation and the horse, when restraining and stopping, both reins are pulled either simultaneously or alternately. And, if necessary, they are released one by one, either once or several times. This is a matter of intuition and experience. But under no circumstances should you stubbornly pull the reins towards yourself; pick up and release them alternately.
And please, when working with the reins, do not forget to use your body! “Containment” (collection) transfers the horse to a slower gait, that is, from a gallop to a trot, from a trot to a walk. In addition, restraining the horse is used to transfer from an extended gait (walk, trot, gallop) to a shortened one. Therefore, every time, before you demand something new from your horse, first “collect” it, that is, prepare it for the next command. The movement of the group is resumed by the command “Group, march”.
Schenkel
Controls the horse's hindquarters, turns, maintains balance and forward movement. You cannot hit the horse with your legs or hit your heels uncontrollably on the sides. To send, pressing your leg tightly to your side is enough. The main action of the leg is sending forward. To do this, the rider presses both legs closely just behind the girth. The leg behind the girth at a distance of approximately 15-20 cm controls the movement of the hind legs during the turn. Also, this movement dictates or prohibits movement to the side.
The horse must be able to quickly respond to the slightest instructions from the rider. Otherwise, for poorly trained horses, as well as to strengthen the team, spurs and a whip are used as additional means of control. A horse whip is used in case of disobedience to a leg signal. However, they cannot hit the animal, but only with a light slap on the croup or shoulder to draw attention to your team. Spurs provide an additional means of pushing the horse's legs, but they should not be used by inexperienced riders.
The correct position of the leg in the stirrup is the key to ensuring that the horse understands your command correctly.
Training trot for horseback riding
The transition from walk to trot is performed in the same way as starting off. If the command “Group, training trot, march!” is given, you need to “collect” the horse by pulling on the reins and pressing your legs. And at the command “March!” you arch your lower back even more, give an energetic push with your legs (a whip is allowed, but is not the main means!) and at the same time weaken both reins so that the horse begins to trot.
When transitioning to a trot from a standing position, your message should be even more energetic and decisive, so that from the first steps the horse begins to trot. In the first lessons this will not work out right away. But later, after three attempts, the horse should trot.
A group of riders, when switching to a trot, as well as when starting from a standstill, should not “scatter”. When trotting, an appropriate distance must be maintained between riders, since at first it is difficult for you to control the horse, restraining or, conversely, sending it depending on the situation.
At the training trot you should sit tightly in the saddle. This means that at each trot pace you should lower yourself gently into the saddle. Like any beginner, you will feel shaky at the trot at first. The reasons are described above in the “Balance” chapter, as well as ways to avoid this. And one day you will be so comfortable in the saddle that you can carry a glass of water at a trot without much risk to yourself. Let's add: this will take time.
We remind you again: please do not tense your muscles, sit in the saddle as relaxed as possible, try to feel the rhythm of the trot. Keep your arms under control (elbows close to your body!). Try to keep your leg as calm as possible without squeezing your horse's sides (heels down!) for no reason. Do not swing the body.
To test whether the horse is actually responding to your commands or following herd instinct, the trainer will ask the group to walk and require that only the first riders take turns moving to the trot or canter. This is where everything will become clear! Energetically give the appropriate message, calmly use - especially at the beginning, when everything is not in order with the landing - the whip. Don't slouch or lean forward, or let the reins slack—these are the three most common mistakes.
At the trot, one should not forget about urging. Your legs now act simultaneously (that is, not alternately, as in a walk). The lower back is arched. Stay straight.
Difficulties may arise when you need to drive from the last place to the head of the group. Your horse prefers to stay in the rear. Gather all your energy in advance, cheerfully drive your horse past all its stablemates. And remember: when you pick up the inside rein to ride along the group, you must loosen the other one.
From theory to practice: how to learn to ride a horse?
Horse Meet and Greet
Training horses are quite loyal to new riders and do not show aggression. If you are learning to ride a young owner's animal, try to have the owner with you during the first contact.
Gently pat the horse's neck, lightly patting it, and stroke it. Horses love such caresses and respond with friendliness. Aggressive behavior in domestic or training horses is extremely rare. This usually happens after receiving a negative experience from a person.
Sometimes an animal can behave unfriendly because it has health problems, is spoiled, or is so trained to communicate with “strangers.” In a poorly tuned animal, the ears are pressed back or erect, the legs are tense, the tail and head are raised up. Ears are also usually raised when eating and asking for treats.
Stroke the horse, saying kind words, until it relaxes and lowers its ears. These representatives of the animal world are sensitive to mood and timbre of voice.
Complementary foods can only be used with the permission of the instructor. Usually this type of taming is not used, but horses love sweets: dried fruits (dates, dried apricots), bread, sugar, watermelon, red carrots. You can purchase specialized complementary foods at a horse supply store.
Turn your back to the horse, press against the neck; if you want to show affection, throw the reins back. If this is done in the traditional way with a sharp jerking movement, the horse will react negatively.
Landing
When boarding, you can grab the mane at the withers; this is convenient and also not painful for the horse, since there are no nerve endings there. It is not recommended to hold onto the saddle due to the risk of it overturning. Pull the reins and grab it at the same time as the mane.
Place your left foot in the stirrup, jump up, holding the mane, and cross your right leg. Place your foot on the second stirrup and tighten the reins. You need to stay in the saddle with your thighs. Avoid sudden movement of the reins. Many horses are not used to this, so they may react harshly to painful movements of the reins and bridles.
Horses move if the rider makes characteristic movements or encourages her with his feet.
Lightweight horse trot
At a light trot, you do not sit tightly in the saddle: when you move forward one of the horse's front legs, you rise slightly in the saddle, and when you bring out the other leg, you lower yourself back into the saddle. One - two, up - down. If you are riding at a light trot for the first time, life seems quite pleasant. The light trot may seem simple, but in fact it is full of complexities.
- First, feel yourself completely in the rhythm of the trot, count: one - two, one - two.
- And on the count of “one,” rise from the saddle. On the count of two, lower yourself.
A few centimeters are enough to lift. The lower the rider stands above the saddle, the more elegant his riding position. As you stand up, press your knees closer to the saddle. Then it will be easier.
Experienced riders always ride at a light trot: at the beginning of a lesson to relax the horse, and over rough terrain when trotting long distances. A light trot protects the horse and rider.
The question arises with which leg to start trotting. The rules require that in the arena the movement begins with the inside front leg. This means that the rider rises and falls in the same rhythm as the horse's front legs. You will see your horse's front legs as you ride past the mirror. And pay attention to your movement partner.
You need to correlate your movement with the movement of the horse's inner (facing the center of the arena) shoulder blade in front of the saddle. When it moves forward, you should stand up. Soon, one glance will be enough for you to determine whether you are riding at a light trot correctly, that is, when to stand up and when to lower into the saddle.
Changing the leg from which to move to a light trot is part of your training program. You will learn to switch from your left leg to your right and vice versa when changing movements in the arena. (Do not forget to transfer the whip to the other hand!).
Make sure that the horse does not “relax” at a light trot, that is, does not lose composure. The softer you rise and fall into the saddle, the more correct the trot. The main thing: don’t slump in the saddle, be flexible. Remember, your knees should be tightly pressed to the saddle, and your body should be slightly tilted forward.
Correct fit
Proper seating is the foundation of how to ride a horse. Without it, it will be impossible to achieve balance in the saddle, maintain balance when moving and “conduct” the horse. This concept includes the necessary position of the arms, legs, and back. The pose should be natural, comfortable, and movements should be free. Follow the instructions below.
- Sit in the deepest part of the saddle, straighten your back so that your head, shoulders, pelvis and heels are on the same line.
- Distribute your weight to your buttocks, relax your upper body, lower your shoulders and keep your elbows straight.
- Keep your arms straight and relaxed so you can feel the movements of the horse's head. Distribute the brushes at the level of the withers.
- Turn the leg (the part of the leg from the knee to the heel) inward, turning the knees towards the saddle, as if hugging the horse. Keep your toes level, with your heels down slightly.
- It is very important to adjust the length of the stirrups so that your feet are in the desired position.
When sitting on a horse, you need to monitor the position of your back, arms and legs
Muscle relaxation and a sense of balance are achieved by performing various gymnastic exercises in the saddle. Therefore, it is very important in the first lessons to ride a well-trained horse under the guidance of a trainer or experienced instructor. This will allow you to develop self-confidence from the very beginning, and will also eliminate the fear of falling and trying to frantically cling to the mane or saddle.
Cavalletti in training
Cavalletti are wooden barriers about 3 m long and about 0.2 m high. During training, they are laid one after another at intervals the width of the horse's stride. When stepping over them, the horse is forced to raise its legs higher than usual. Thus, cavaletti contribute to the development of a high, hammered gait.
The horse is allowed to walk or trot through the cavaletti. Depending on the gait, the interval between barriers is changed (in general it ranges from 1 to 1.3 m). When performing the exercises, the rider stands straight, looks ahead, and the body is slightly tilted forward (this helps raise the horse’s hind legs). The message is given by the legs.
Learning to take turns
Galloping requires a lot of space - it is a fast gait, so the horse instantly covers long distances. More often, to train a horse, they use horse racing on a long rope, one end of which is attached to the horse, and the other is held by the trainer. Moving in a circle is not difficult for a horse, even if it is galloping. After all, when moving monotonously, the horse always takes the same sequence of steps. But if you need to turn the horse in a different direction, you will run into a problem.
It is important to turn a galloping horse towards its leading leg.
At a slow gallop, the horse itself adapts to the movement. During the training period you will not have any difficulties in managing. Unless you should shift your weight towards the upcoming turn, so as not to fly out of the saddle. It’s a completely different way to turn at speed, with stubborn animals or when there is a possible danger on the future path.
Before turning, you need to place your lead foot correctly. The rider first takes a normal position on the horse, and when the pace evens out, he shifts his body towards the future turn. The leg leg on the side of the upcoming turn is pressed against the girth, and the outer leg is pressed behind it. There follows a small push with the legs, after which the horse must change the position of the limbs to the desired one.
When you have achieved the correct position of the limbs, you can begin to turn. By pulling the reins from the inside, the head is tilted in the desired direction. The outside rein and pressed leg control the radius of the turn, and the inside leg sends the horse forward, setting the pace.
You can control the correctness of cornering by following the horse's tracks.
. Normally, the hind limbs should follow the forelimbs, that is, the prints either coincide or are located as close as possible - this is called a volt. It is difficult to achieve the correct galloping technique - you need to precisely coordinate your actions. Horses especially often cut corners during training in arenas - in this case, the pelvic limbs extend further than the thoracic limbs. To correct the movement, you need to press harder with your inner leg - to push the horse out of the circle.
To train the horse and rider, training is carried out to increase and decrease the voltage. For this purpose, the horse is forced to move in a spiral, that is, so that the hind limbs either go behind the pectorals, or vice versa - do not reach them. To reduce the volt, you need to apply more pressure with the outer leg, but you do not need to over-tighten the inner rein. To increase the turning radius, guide the horse out of the circle, pressing on the inner surface with the leg.
Controlling a horse at a gallop
Galloping is more enjoyable than trotting. Beginners can learn to gallop after just a few lessons. The pleasure of a faster gait and a pleasant feeling in the saddle will help overcome the initial disappointment of trotting. I remind you that when galloping, your body should be relaxed, adapt to the movements of the horse. If after each beat you plop down in the saddle like a sack of flour, the horse’s spine will seem to stiffen.
While you are not yet sitting well enough in the saddle, try to “fidget” in the saddle at each pace of the horse’s movement, trying not to sway. As with the easy trot, your body should remain in a state of relative rest; The horse's movement is compensated by the movements of your pelvic girdle and hips.
In addition to the usual holding and collection, you must especially carefully prepare the horse for the transition to the canter. The fact is that if at a walk and trot the horse is straightened and moves straight, then during a gallop it bends somewhat (“internal stance”): from the left leg to the left, from the right leg to the right. Therefore, increase the pressure with your outer leg. This way you sit on the horse as if you were taking a step. Sit more firmly on your inner buttock (try not to lean to the side!).
Pull the inner rein a little tighter than the outer rein. By strengthening the action of your legs while weakening the inside rein, you raise the horse into a gallop. If the call to gallop is made without appropriate preparation, the horse in most cases does not go into gallop.
Check to see if the horse started the gallop on the right foot. If you don't feel the horse's hind legs moving yet, look at his front inside (facing the center of the arena) leg. The horse throws it far forward, and thus it comes into your field of vision. If you can't see your horse's front inside leg during the second beat of the canter, it means your horse is on the wrong leg, called a counter canter. Bring the horse back to a trot or walk from the inside leg, slightly pulling on the inside rein, and lift him back into the canter. When riding in a group, you must, of course, move to the second (inner) lane to perform this maneuver.
We consider it correct to first practice the transition to gallop from a walk. At a trot, the temptation is too great to push the horse so hard that the poor animal will end up galloping. Practice the transition from walk to canter in single lessons. If the horse trots instead of galloping, it means that you did not pay enough attention to any of the sending commands.
Procedure for galloping:
- collect the horse;
- turn the horse's head slightly inside the arena, strengthen the action of the external leg, tilt the body slightly forward;
- Pull the inner rein a little;
- swing your body sharply, give a signal with your legs, and at the same time release the inside rein.
To keep your horse in the canter (to avoid breaking into a trot), watch your seat. The body should be slightly tilted forward, the outer leg pressed tightly. Do not touch the outside rein (the hand holds it calmly). Give the inside rein a little slack in accordance with the rhythm of movement. You must maintain contact with the horse with both reins.
From a training point of view, each gallop pace is performed separately. The command “Change direction at a gallop, march!” means changing the leg from which the canter was started (unless you receive a clear command to continue the canter from the previous leg). To change the direction of movement at a gallop, move your horse to a walk (not a trot!) in the middle of the arena track, walk several paces, prepare the horse and change to a gallop with the other leg.
Take your time. Haste does not contribute to changing legs at a gallop. When changing legs while cantering in a group, increase the distance between the horse in front in advance to avoid bumping. You can also move from a gallop to a standing position. To do this, the horse is taken over (the reins are pulled) more rigidly. The braking distance is much longer than for a trot. So, if the command “Troupe, ... march” is given, you already know what will follow next with “trot”, “walk” or “stay”, so you can adjust the distance to the horse in front.
Conclusion
Today, almost every major city has stables or equestrian clubs. Therefore, anyone can find out how to learn to ride a horse by attending special courses or riding lessons. It is advisable to immediately sign up for courses with an experienced coach or instructor in order to fully master the rider’s skills. Having learned to maintain balance and balance, to control a horse, you can safely go on a horseback riding trip or have a pleasant horseback ride through the nearest forest. A horse is a living cure for depression, and riding in the saddle is a wonderful form of active recreation.
- Wear all the safety gear you have. A helmet and pads will help you if you lose your balance or if your horse rears up.
- Make sure that there is nothing dangerous around you, because it is very difficult to stop a horse that is galloping, this is only possible if it is very well trained. While most horses will stop on their own, on the edge of a cliff or something similar, you don't want to take that chance.
- Always try to ride with someone. After all, if something happens to you while you are riding alone, it may take a long time to find you. Maybe in the movies they show how a horse drags a person to a village, but in real life this happens quite rarely.
- Try to use the same horse when riding, or the more often the better. By doing this, you can get used to the horse and how to handle it, and the horse will become more comfortable with you. At the same time, don't assume that all horses are the same - just because you balanced well on one horse doesn't mean you'll do the same on another.
- Don't try to gallop if you are saddling a horse for the first time. Gaining experience at cantering can be quite difficult, especially if you don't have much experience with horses. Galloping can easily turn into out-of-control riding. Make sure you are able to stop your horse if he loses his head.
- When you gallop, your horse must trust you. If the horse doesn't trust you, then most likely he will not be comfortable with you and will try to throw you off (or if you are not familiar enough). You need to connect with the horse and have a good rider-horse relationship before you ride it.
- Keep trying. Don't be discouraged if the canter doesn't come out the way you would like. Perfect canter takes practice and balance. Don't forget about patience.
- As mentioned earlier, lighten the canter. This time, know your limits. The horse can gallop for a long time, but you want to make sure you are prepared for it. Always remember that not only can the horse become tired from riding, but so can the rider. It is just as dangerous to put pressure on yourself as it is to put pressure on a horse. You can easily lose control. Be sure you know your capabilities and the horse's capabilities. In this case, a cheerful gallop across the field will not turn into a disaster. And don't forget to enjoy the process. Galloping means being one with the horse.
- Regarding the previous statements, it is not always worth using one horse. For beginners, it is good to ride the same calm, trained horse until you have learned to ride well enough, after which it is good to move on to a tougher horse, this way you will gain experience with different types of horses and become an even more experienced rider. Different horses, with more complex personalities, are ideal for training to become a better rider and stay in control. This will teach you to control your horses better and make them easier to control.
Horse riding as a hobby or sport is becoming increasingly popular. Many people like the speed at which horses rush in gait.
The fastest type of movement for horses is gallop. This method of driving is discussed later in the article.
Long reins - loose reins
In the first half of the lesson, you tried to use the reins to force the horse to lower its head and “tuck up its chin.” By arching the cervical vertebrae, greater mobility of the horse's back is achieved. The more willingly the horse “gives up his head,” the softer your hand should be. Action gives reaction - and compliance should be rewarded with compliance: the reins are released longer, the horse lowers its head down. But nevertheless, she must go with the bit, and should not lose contact with the horse’s mouth.
A completely different thing is a freed, released reason. Burdened by time, the horse needs a break to rest. The reins are slack, the message is not given. The horse can plod along, completely relaxed. Then the command “Pick up the reins!” is given. - and back to business.
Now let's talk specifically about the reins: from time to time, both reins should be held in one hand to tighten the girth, adjust (from the saddle) the length of the stirrups, or simply pat the horse in gratitude on the neck. Both reins are taken in the left hand, and the horse is patted on the left side of the neck with the right hand. Take the second rein in your hand so that the end going to the bit comes out of your fist from above. This way you can control both reins by rotating your fist.
What is gallop
How fast and sweeping the running of a galloping horse is can be judged by the fact that during movement its stride can be 3 times longer than its body.
That is, gallop is a natural gait for a horse, with the help of which it develops maximum speed. Since this type of gait requires a lot of effort from the animal, it is not able to gallop for a long time.
However, it is impossible to say for sure how long a galloping horse can gallop without stopping. It all depends on the age, health, training and breed of the horse. Some of them can gallop at a high pace for 2 km, and others - 3. But the vast majority of horses cannot do this anymore. Exceeding this limit can lead to serious health problems for the animal and even death.
Did you know?
Including wild horses, the horse population on Earth is approximately 60 million.
Difference from other gaits
There are 3 ways of natural horse gait through:
- step;
- lynx;
- gallop
It is not difficult to guess that a trot is faster than a walk. When walking, the horse moves at an average speed of between 4 and 7 km/h, developing maximum traction force at such a slow gait.
When trotting, animals move much more quickly, developing an average speed ranging from 10 to 20 km/h. In competitions, some trotters specializing in this type of gait can reach speeds of up to 50 km/h and even higher.
And although in natural conditions the average speed of a trot is much lower, it allows horses to move over long distances without getting too tired.
A galloping horse moves more than 2 times faster than a running normal trot.
average speed
The speed that a galloping horse develops depends on its breed, training and racing conditions. Therefore, it is impossible to say for sure how many kilometers per hour a horse accelerates in this type of racing.
The world record reaches 71 km/h, but the average speed for this type of running of a horse with a rider lies between 40 and 50.
Precautionary measures
A novice rider should learn to gallop with his horse under the supervision of an experienced trainer.
For the safety of both rider and horse, it is necessary to:
- start galloping on a horse that walks in a circle using a cord;
- do not ride a horse without a helmet;
- Under no circumstances should you shout or squeal while running fast, so as not to frighten the horse, which may “carry away”;
- do not lean forward too much (which is completely unacceptable and can lead to the rider flying over the animal’s head during a sudden stop);
- do not allow the galloping horse to lower its head.
To learn how to gallop on a horse, you will have to put in a lot of physical and nervous effort.
Important!
Under no circumstances should you water your horse after a long race earlier than 1.5-2 hours.
However, the result of tedious training will be not only the invigorating clatter of hooves, the whistle of the wind in your ears and the creaking of the saddle, but also an exciting feeling of unity with this beautiful animal.
How to properly control a horse?
Now you know how to sit in the saddle. True, it will take some time before your hands and feet learn to follow these rules. But how do you get a horse to do what it should do?
We are not going to discuss how a young horse is taught to “walk under saddle,” that is, ridden. After all, you will be dealing with a horse that, in principle, has already been trained; She will sometimes even react more quickly to the command of a trainer located 20 meters away from her than to what you painfully try to beat out of her with your heels.
At the very beginning I wrote that the horse is a very obedient creature. Disobedience in most cases is due to complications in mutual understanding. Perhaps the rider is not communicating correctly to the horse what he should do. Or he's not persistent enough. In any case, if something doesn’t work out, then 10:1 it’s the rider’s fault.
To control your horse, to explain to it what it should do, there are “messages”. There are three of them: body, leg and rein.
This series is full of meaning. Because the harmony of joint movement depends on your ability to correctly move your center of gravity in accordance with the horse’s center of gravity. Prompting signals with legs are much more important than restraining actions with a rein. After all, you must first force the horse to move energetically before you have the opportunity to slow down and change this movement. This applies to horsemanship in general - and most of all to the beginner's horse, who has just begun to conquer, who needs to be really firmly taught what is required of him.
Checking the horse's saddle
Enough theory, let's get down to business! Most often, the group enters the arena gradually, rider by rider. The horses are led on the bit, the left and right reins are passed between the index and middle fingers of the right hand. The whip is in the left hand, otherwise it would interfere with the horse, and it is generally not customary to hold it behind the boot.
If you enter the arena alone (or the first of many), you should shout loudly and clearly: “Make room, please!” Your request will be fulfilled, and at this moment no one will drive through the gate. Only after the trainer or rider on duty answers “Passage is clear” do you move the bolt and swing open the gate.
If you are alone (or the last in a group), then securely lock the gate behind you. An open gate is a constant danger; a poorly locked gate is an even greater danger. The first time you get bruised knees, you'll understand why. In the same order in which they entered the hall, the riders line up on the center line, facing the long side of the arena (all in the same direction!), with an interval of approximately 3 m between horses (that is, per horse's body).
Now it's time to check the quality of the saddle. The fact is that on the way from the stable your horse “lost weight” a little: when saddling, its muscles were still tense and therefore had a slightly larger volume. Now you can confidently tighten both girths by one or even two holes. All this is done from the left. Only when the last hole on the left side of the girth has been used, do they look on the right side to see if it can be tightened further.
If possible, then completely release the girth on the left, fasten it all the way on the right, and then adjust both girths on the left again to the desired tension. A little troublesome? Undoubtedly, but during training you will definitely not fall along with the saddle under the horse’s belly. To really tighten up the girth, here's a trick: rest your right elbow on your right thigh and use your arm as a lever.
This is how you check the correct length of the harness. With an outstretched arm, the fingers of which touch the saddle, the stirrup reaches the armpit. The stirrups can only be adjusted accurately from the saddle. If the girth does not budge despite your best efforts, then either another rider has changed the girth (and you will have to determine the actual length), or you yourself have grabbed the wrong saddle.
If you need to tighten your girth during exercise, stay in the saddle! Move your left leg forward a little and lift your hip, then you will reach the girth from above. The leg should be removed from the stirrup. The next step is to release the harness and adjust its required length.
You should determine the length in advance, even before getting into the saddle, since adjustments may need to be made during exercise. The length of the harness (including the stirrup) corresponds to the length of the rider’s outstretched arm from the fingertips to the armpit.
The free end of the harness should go down obliquely and tuck into the eye of the wing. If there is no eyelet or the end is short, then it is tucked under the harness so that the end faces back. Remember: buckle marks left on the strap do not guarantee the appropriate stirrup length. Belts have the ability to stretch and tear.
This is how the rider holds himself correctly: the harness is turned outward, the stirrup itself is located on the wide part of the foot, the foot is slightly turned outward. You should feel the real length while sitting in the saddle. Use a mirror and make sure the soles of your boots are level. Later, you yourself will feel what needs to be adjusted and where. Like other adjustments, riders do this without dismounting!
When checking the correct saddle and adjusting the stirrups in the arena, stand next to the horse and put one hand through the reins. In this case, the rein remains on the horse's neck; it is long enough for this. If you forget to do this, the horse will run away from you on occasion, and catching it again is not at all an easy task, even in the arena!
If your horse does run away, do not run after it, the horse still runs faster. Try to catch her by approaching slowly, speaking kindly to her, luring her with a piece of sugar and quietly driving her into a corner where it is easiest to grab the reins. And when the horse is caught, caress and praise it. She should have a strong impression that her life is much more pleasant with you than without you!