In normal home conditions, using the simplest tools, making a quail incubator with your own hands is as easy as shelling pears. To do this, you do not need to have special knowledge of a carpenter or mechanic.
What can I say, I personally know the case. When an ordinary old lady herself made an incubator out of an old refrigerator, which has already worked for five years and she is completely satisfied with it! Everyone knows the extraordinary benefits of quail eggs and meat. By the way, the demand for them is growing every year. Hatching quails in an incubator is profitable and in demand. Therefore, raising these birds with proper organization can become a profitable business.
Unlike raising other species of birds, there is some complexity. Which is that female quail breeds bred in captivity do not know how to hatch eggs. But don't be discouraged! There is a way out and it is quite simple and convenient. Namely, the conclusion is that quail from eggs should be entrusted to the incubator. And here another question arises, namely, whether to buy an incubator or make it yourself. That is, make a home incubator with your own hands.
Do-it-yourself quail incubator? Or is it better to buy?
Very often, quail breeders, due to the small size of this bird, keep a flock of more than a thousand heads. And here the question of purchasing a large professional incubator may arise. Which is quite expensive, but is not without many disadvantages. So what to do? Buy expensive equipment that will pay for itself over many months? Or do it differently? Namely, make an incubator for quails with your own hands according to drawings and projects. Which are proposed in our article and verified by the operating experience of many quail breeders.
Incubators of various types and manufacturers are available for sale. If you incubate a small number of eggs in them, they will cope with the responsibilities assigned to them. But if we talk about large scales, then there may not be enough capacity. Agree, this is not very convenient. Keep three, four or more incubators in the room, constantly monitoring each one individually.
Eggs in a tray
The second option is also not the best - purchasing an industrial incubator. Logically, its main disadvantage is its high cost. That is, being on the premises of an industrial installation is also associated with certain inconveniences.
Industrial incubators
Many quail breeders have developed the opinion that the price of incubators for more than five hundred eggs is unreasonably high. Because they disassembled such incubators and know the parts from which it is assembled. Experienced breeders can see that the cost of all parts individually is no more than a few tens of dollars. Maybe even a little higher, but in any case these are relatively inexpensive parts.
Another important drawback of industrial-type incubators. This is because most models do not include the possibility of backup heating. In case there is a sudden power outage for a long time. Agree that installing a mini-power station running on gasoline or diesel fuel in a small farm is also not the best option. Firstly, again, the high price of good models. And secondly, the noise. If incubators are installed in an apartment, then you cannot avoid complaints from your neighbors. In addition, domestic models are not reliable and can fail at the most inopportune moment.
Practical experience of breeders
One quail farmer shared his bitter experience. At the time, he had more than 3,000 eggs incubating in several industrial models. Once, at the beginning of spring, the electricity was cut off for half a day. It was not possible to start the mini-power plant. As a result, the eggs remained without heating for almost twelve hours. During this time they managed to cool completely. As a result, the hatch from selected eggs was only forty percent. At the same time, the quail chicks were born frail and almost half of them quickly died.
It is precisely because of the risk of occurrence and recurrence of such situations that many experienced poultry farmers recommend making quail incubators with their own hands.
Differences in feeding
As for feeding birds, there are several important points to consider:
- The chicken diet is much simpler than the quail diet. To make work easier, some poultry farmers try to feed all their birds the same food, but this is wrong, because chicken feed does not contain the nutrients that quail need. And although special feed for young broiler chickens is quite suitable for quail food, it is nevertheless necessary to mix additional ingredients into these mixtures: fish meal, crushed sunflower seeds and corn, dried chopped grass, pine needle flour.
- If the chicken coop is small, then organizing separate feeding of chickens and quails will not be easy. In any case, the quails are given food first, since in the process of eating, sloppy birds scatter food around, and chickens pick up the scattered remains of food and finish it.
- At first, the feeding process should be under the control of the poultry farmer; this is necessary in order to stop bird fights for food. If a fighter appears in the herd, constantly bullying his relatives, then he needs to be isolated from the team for a couple of days. If you do not pay attention to the behavior of the aggressor, then other birds also begin to fight among themselves. After a few days of isolation, the bird can be returned to the chicken coop, but if the behavior of the troublemaker does not change, the individual is sold or slaughtered for meat.
- Water intended for drinking must be clean. For chickens, drinking bowls with water are installed on the floor of the chicken coop; for quails, drinking containers are firmly fixed to the walls of the cages. Drinkers intended for chickens must be designed to prevent them from tipping over. In winter, the water should be warm for chickens and quails. Quails can catch a cold from cold water, and a chicken drinking cold water will not lay eggs in the winter.
- To provide their pets with vitamin C for the winter, farmers harvest rowan berries in the fall, which grow in large quantities in deciduous forests and forest plantations. Dried and crushed, the berries are regularly added to bird food throughout the winter. Dried berries should be stored at home or in another dry and warm room.
If you comply with all the conditions described above, then the chicken flock and quail will be able to live in the same territory, the main thing is to control their communication during the first ten days together.
Video “The simplest incubation system.” DIY quail incubator
Video of the simplest incubation system.
At the same time, with the funds spent on purchasing one incubator, you can make several. Approximately the design that suits you best. And which will provide an alternative heating system in case of a power outage. Many quail breeders can boast of high hatchability in homemade incubators. Which sometimes exceeds 90 percent, while they are much more convenient to use. The most surprising thing is that some designs do not include a thermostat, humidifier and fan. Nevertheless, their hatchability is high. And among the quails born, there are practically no sick or defective ones, almost 100% survival rate!
How to hatch chicks
Quail breeding begins with the selection of high quality eggs that meet certain requirements. Storage before incubation should be no more than 1 week, and at temperatures up to 15°C. Despite the individuality of the breeds, on average, chicks hatch at 18 days. At first, the temperature in the incubator is set at a higher temperature, but it is gradually reduced. Trays must be turned over at least 6 times a day.
As can be seen from all of the above, making an incubator for breeding quails is not at all difficult. A thoughtful attitude will allow you to quickly find your bearings and assemble a good apparatus, which will allow you to get your first brood in the near future.
Find out also how to make cages for quails.
Making a quail incubator with your own hands
We present to your attention one of the quail incubator projects. Which can be done by yourself.
Incubator drawing
Decoding. DIY quail incubator
- Lid;
- Incandescent light bulbs;
- A door through which trays are removed and cleaned;
- Tray location;
- Additional heating chamber door;
- A container into which hot water is poured;
- Capacity for air humidification;
- Inner wall of the incubator;
- Insulation material;
- Outer wall;
- The direction in which the trays can move.
Types of incubators, what requirements apply to them
The modern market offers a wide selection of various incubators for eggs of quails and other birds. Many models are universal - they are equipped with grates of different sizes and have fine temperature settings. Thanks to this, they can be used to lay eggs of quails, chickens, geese, turkeys and other birds.
Tiny chicks
When choosing a suitable model, you need to ensure that it meets the owner’s requirements for the number of chicks hatched. After all, today there are a variety of models - some allow you to work with only five to seven eggs at a time, while others make it possible to hatch five to seven hundred birds in the same time. Of course, for a small farm, incubators that are too large, as well as very tiny ones, are definitely not suitable.
Another important requirement is the ability to operate on a rechargeable battery. After all, power outages can happen at any time. And several hours without heating in a cool room will lead to the eggs deteriorating, and it will not be possible to get chicks from them
And several hours without heating in a cool room will lead to the eggs deteriorating, and it will not be possible to get chicks from them.
What you need to pay special attention to
There is no secret to such high hatchability, but some points are still worth noting separately.
This is a constant source of heat that does not depend on the stability of the electricity supply.
For this purpose, a separate chamber was provided at the bottom, separated from other parts of the incubator by three layers of plywood with holes. This compartment had a separate lid. When the power supply stopped, hot water was poured through it into a special 10 liter canister. The ventilation was also closed, and the incubator was wrapped in a blanket.
This battery turned out to be very effective and retained heat well for 12 hours. When the water cooled down, it was not difficult to heat it up again.
Temperature uniformity in the incubator
The second point is that the heat was distributed evenly throughout the incubator.
As we know from school, warm air always rises and eggs need to be swapped from time to time. In factory-made incubators, this situation is avoided by constantly swapping trays. That is, the top ones are placed down and vice versa. Also, in household incubators, eggs need to be transferred frequently. Those in the middle are swapped with those on the edges. When making your own incubator, you can provide two heat sources.
That is, one at the top and the second at the bottom. For heating in this case, it is reasonable to use several incandescent light bulbs. You must determine the power and quantity yourself based on the design of the incubator and its size. The third point is optimizing the temperature inside the incubator.
To optimize the temperature regime, the bottom of the trays can be made of iron mesh. To allow warm air to pass through as quickly as possible. It is better to make the trays themselves not stationary, but so that they can be moved. On each row (there were 3 of them), not a single tray is installed, but a pair. At the same time, their size is equal to 1/3 of the area of the row.
In this way it was possible to solve the issue of temperature fluctuations. Because the eggs have always been located in the middle part of the incubator and incubation takes place in the best conditions. To prevent rapid cooling of the incubator while turning the eggs, the lid is not placed on the side. It is done in the upper part and during the turn it was necessary to simply move the upper trays to the sides.
To summarize, the main points should be noted. Namely the following.
The quail incubator body can be assembled from almost any material. Which one you either like best or will simply be at hand. This can be plywood, chipboard, fiberboard and boards.
Ultimately, the structure is insulated using foam plastic or other insulation.
Ventilation and temperature control
Ventilation and temperature regulation are provided by holes in the top cover. The number of holes is determined experimentally. It is also necessary to provide special plugs with which they can be closed. Regular heating should occur using light bulbs. And in the event of a power outage, a container will be required as an additional heat source. You need to pour hot water into this container.
Know the basic principles of incubating quail eggs and put them into practice. And you can easily assemble a good incubator for any number of eggs.
In a nutshell, an incubator is an ordinary box made of heat-insulating material. It has a heating system and special trays on which the eggs are located.
Principles of use
Before sending eggs into the machine, it is necessary to test the device. You need to measure temperature and humidity. Moreover, it is necessary to ensure that the temperature is at a certain level for some time.
If everything works well, you can begin breeding quails artificially. To do this, you will need fresh eggs that were laid no more than 7 days ago. Of these, chicks appear in 90% of cases. The longer the starting material is stored, the lower the likelihood of obtaining the desired result.
But even those 7 days that are given for storing eggs have some nuances. First of all, this concerns storage temperature. It should not be more than 22°C. Eggs that are intended to be placed in an incubator should never lie in the sun. It is advisable to store them at an air humidity of 80%.
Those eggs that are preparing to be sent to the machine should be stored on open shelves. It is advisable to lay straw under them to ensure the safety of the shell. They need to be turned over once every 2 days. This process is necessary to ensure that the embryo does not stick to the shell.
Experts recommend not storing quail eggs for incubation for more than 7 days. However, if it is not possible to place them in the device within this time frame, you can slightly extend the waiting period. To do this, the eggs are placed in plastic trays and then in bags that are hermetically sealed. Next, you need to place them in a cool place with a humidity of about 60%. This will extend the shelf life of quail eggs for the incubator by another week. But still, the best results are obtained when using the freshest products, which were demolished 1-2 days ago.
When raising chicks using a homemade incubator, do not forget about the need to turn the eggs according to schedule. The incubation period for quails is 17 days. Therefore, after the end of the second week, you can no longer disturb future birds.
Incubator project with backup heating
Try to make an incubator with your own hands according to the design of a famous poultry farmer. To do this, you will need a little ingenuity, ordinary tools and inexpensive materials. Let us immediately note the high efficiency of this design. Its main difference from others can be considered the equipment of the incubator with a tank of water. Which is a heater and functions even when the power goes out.
Tools and materials. DIY quail incubator
To assemble an incubator with your own hands, you will need the following:
- metal container for water;
- plex;
- 100 Watt light bulbs;
- sockets used in conventional chandeliers with an external nut;
- tap;
- water tray;
- five blocks (wooden), they will be the base of the frame, size 40x40;
- egg trays;
- metal mesh with a cell of 13 by 13;
- nylon mesh;
- glass;
- electric drill;
- polystyrene foam for insulation;
- fiberboard sheet;
- fiberglass.
Assembly
To do everything correctly, carefully read the instructions and follow all instructions.
- First you need to make an element for heating i.e. water tank. If there is no ready-made container of a suitable size, you will have to make it yourself. For this we need galvanizing 4 millimeters thick. From a pipe (d=4 inches) we make upper pipes (h=30 millimeters). Next we need welding, which we use to weld them in the upper roof of our container.
- After welding, you should get a side, which is needed as a plex lamp limiter. The thickness of the plex is about five millimeters. Now you need to cut a couple of disks from the plex. The outer one is d=95 millimeters, the other is the same size as the cartridge. That is, observation will take place through the plex parts.
- Pour water into the container.
- Now you need to lower the bulb bulbs into water to the length of the socket.
- A faucet must be inserted into the side of the container to drain the water.
- The upper part of the container is insulated using polystyrene foam, the thickness of which is 40 millimeters. If there is a power outage, the temperature may drop by no more than 1 degree in 12 hours.
- Next, we proceed to the installation of the structure, which consists of a wooden frame assembled from five bars.
- We make places for laying eggs from a metal mesh with a cell size of 13x13 millimeters. We will place a nylon mesh on top of it.
- Now you need to make an inspection hole in the front wall. Additionally, protect it with double glass.
- At the bottom of the case you need to make nine holes with a diameter of twelve millimeters for ventilation. We make the same number of holes and the same diameter in the upper part.
- We insulate the top using polystyrene foam and then fiberboard.
- The bottom of the tray located below is made of fiberglass. The thickness of which is 2 millimeters.
- We fix the lower tray using screws from below.
- Now you can place a saucer of water on the tray.
- After installing the thermometer, the work can be considered complete.
- The incubator is ready and can be used. Before laying eggs, check how it works and maintains temperature.
Scheme with decoding
Laying incubation material
If everything is clear with the installation of incubators, then you need to figure out how to lay eggs correctly.
Of course, all of the above aspects are very important, but the owner is also recommended to check the selected products using an ovoscope for viable embryos.
As for direct bookmarking, it can be done in two ways:
- horizontal;
- vertical.
The second option uses special trays. The eggs are laid with the sharp end down, and the products are positioned at an angle of 45 degrees.
To get high-quality offspring, you must follow the rules for incubating quail eggs.
Little quail
To make a homemade quail incubator with your own hands, you need to find a polystyrene foam box, a small sheet of aluminum and tin cans. It’s also worth buying several 15-watt light bulbs and a computer cooler.
A high-quality cooler is needed in order to maintain the optimal temperature in the product, regardless of the location of the incandescent lamps. Plywood is needed to mount lamps and a cooler on it, because the mount to foam is not reliable. Special screens are made from cans so that the thermal energy from incandescent lamps is dissipated throughout the entire product.
To turn over a tray of quail eggs, you need to place a special grid with a small mesh size on the bottom of the foam box. Absolutely all pointed edges of the tray are filed with a file. Next, a small piece of metal wire is attached to the grille, which is necessary for turning the tray with quail eggs over. You must remember to place a small container of water in the incubator, which will maintain an optimal level of humidity.
To regulate the temperature inside the mini-incubator, you should use a good digital controller. For the chicks to feel comfortable in the apparatus, it is necessary to constantly maintain an optimal level of air humidity. That is why you need to put a special psychrometer in the incubator.
It is necessary to spend a small amount of time to ensure that the quail has good health and a strong physique. Additionally, you can watch numerous videos from the network that show the process of making various models of home incubators with your own hands.
Five more homemade incubator projects
Check out five more simple yet practical projects. Perhaps one will suit you.
Project No. 1 (Made of wooden beams and plywood)
We assemble a frame from a wooden beam, then cover it with sheets of plywood. At the same time, we insulate it using polystyrene foam. Depending on which option you find more convenient, the lid can be placed on the top or side.
We make a glass window in the lid. This is necessary so that you can observe how the incubation proceeds.
This project uses a pair of 40 W light bulbs as a heating element. There may be more light bulbs, and their power may also be different. That is, it all depends on the dimensions of your structure. If the cover is located at the top, then the light bulbs need to be installed slightly below it.
Manufacturing instructions
To make a quail incubator with your own hands, many craftsmen use an old refrigerator or an ordinary box, not forgetting about additional thermal insulation.
But there are certain requirements for the room in which the incubation system will be located. The temperature in it should not fall below +20 degrees, and in the device itself - no higher than +38 degrees.
To ensure good ventilation, several holes need to be drilled in the lid. They can be opened and closed, thus adjusting the temperature and humidity to the desired level.
To make the body, various materials are used:
- Fiberboard;
- chipboard;
- plywood;
- tongue and groove board.
Foam plastic can act as insulation. Below we will present several ways to make your own quail incubator.
Method No. 1
A frame is made from wooden blocks, which is then covered with plywood sheets. Ordinary foam plastic is used as insulation. The lid can be made on the side or on top. If it is made of the same material as the walls, then it should be equipped with a small glass window. It is necessary in order to visually monitor the incubation process.
Electric light bulbs with a power of 40 W are usually used as heating elements. Their number depends on the size of the structure. The optimal temperature required for hatching eggs should be 22 degrees and air humidity 50%. If the cover is located in the upper part, then the lamps need to be installed slightly below its level.
Several ventilation holes are drilled in the bottom of the structure. The tray with eggs must be placed at a distance of 10 cm from the floor. It can also be installed on foam plastic that remains after insulating the walls. The tray is made in the form of a wooden frame, between the walls of which a fine mesh is stretched.
Method No. 2
The principle of manufacturing such a design is practically no different from the above. The only difference is that the plywood sheets should be stuffed on both sides of the frame, resulting in a double wall.
Holes for ventilation must be drilled in the floor and in the lid. It is recommended to fill the space between the walls with the following materials:
- tow;
- sawdust;
- Styrofoam.
It is necessary to provide the plates that will be required to close the ventilation. Thanks to them, you can control the humidity inside the structure.
Method No. 3
To make such an incubator, you will need thick plywood or a chipboard cabinet. An old TV stand will work great. It has glass doors, thanks to which you can control the incubation process.
Holes for ventilation are drilled in the top cover of the cabinet, and a household fan heater is used as a heating element. A metal mesh is used to make the floor. The three trays in which the eggs are laid must be installed at the same distance from each other. To attach them, you can use a steel plate with mounting holes.
The plate itself should be attached to the walls using movable fasteners. A handle for turning trays is fitted in one of the walls by drilling a hole for this. This allows you to change the position of the incubated eggs every two hours.
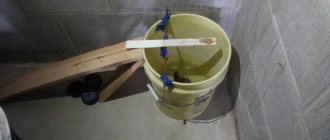
Method No. 4
Such a device is made if the number of eggs for incubation is quite small. Under the incubator, you can adapt an ordinary plastic bucket with a lid in which you need to cut a window. A heating element, such as a light bulb, is installed at the top of the bucket, and a mesh is attached in the middle to place the eggs. It is recommended to drill ventilation holes at a height of 7-8 cm from the bottom of the container.
To maintain the required level of humidity, a small amount of water is poured into the structure. The position of the eggs can be changed by tilting the bucket itself. For this purpose, a block or plank is placed under the bottom. The angle of inclination should be 45 degrees, no more.
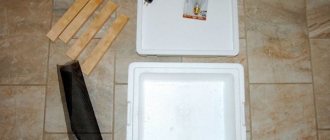
Method No. 5
To make a quail incubator, you can use an old refrigerator. It is sealed and large in size. The food shelves will be used as trays for placing eggs. Ventilation holes are drilled in the walls and incandescent lamps are installed. If such a need arises, the walls are insulated with foam plastic. To turn the trays over, use a metal plate on a movable mount.
Tips and tricks
- When making a quail incubator with your own hands, you need to consider several points.
- Do not use outdoor thermometers to measure the temperature inside the incubator. They are very inaccurate, so it is better to use medical ones.
- The thermometer should be placed near the eggs, but in no case should it touch the shell. Otherwise the data will be incorrect.
- If the incubator is large, then it is advisable to install a fan in it. This is necessary, since the temperature of the eggs at the top and the temperature of the eggs at the bottom are different. That is, the air circulation coming from the fan will restore the balance.
- Do not measure the temperature immediately after switching on. Most likely, the readings will be incorrect. Wait about an hour.
As you can see, making a quail incubator with your own hands at home is not difficult. The main thing is that you will not only save a decent amount, but also get an easy-to-use device.
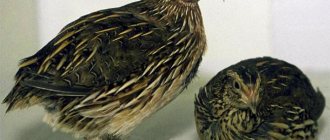
Conditions of detention
You know, in order to keep two hundred quails, just one room and eight cages are enough. My father didn’t even have to build a chicken coop - they fit perfectly in the basement of a country house. True, they need appropriate conditions: air humidity 60%, temperature about 25 degrees and dim lighting, even twilight.
Read also: Cages for quails: photo drawings, Your Own Builder
If they are not provided, problems may begin. My father was faced with the fact that his birds were going bald. Literally. He took them to veterinarians for a long time, took tests, but the cause was never found, the quails were absolutely healthy. Only they didn’t have feathers. It turned out that their plumage was affected by excessively high humidity - the hygrometer showed more than 80%!
How much space do you need for chickens? That's right, a separate room, preferably with a special walk. But it needs to be cleaned at least twice a week to avoid unsanitary conditions. And what a “wonderful” aroma of poultry is in the air! Imagine watching even fifty chickens trample on a green lawn every day. On the third day after such a walk, only a memory will remain from him.
Problems for chicken farm owners arise during the cold season. In order to maintain such a livestock, it is necessary to provide heat to the chicken coop, because in winter the bird can die from the cold.
Quail owners have an easier life, even if the number of birds is four times greater. In winter, it will be enough to move the cages to a heated room. A house basement or garage will do.
Important! If you house chickens and quails together, the risk of quail eggs becoming infected with salmonella increases. Chicken manure can get on the shell and become a source of infection.
If you keep both of them, then in different rooms.
A chicken is four times larger than a quail. Even the largest one. Even a broiler. And her egg size will be correspondingly larger. In the previous paragraph, I consciously wrote about two hundred quails and fifty chickens. In this ratio they are equal, and you can see the difference in keeping approximately the same number of birds.
True, if you look only at the size, then the quail lost in this competition; it will not cope with such competition. But she needs less food. But more on that later.
How much can one chicken eat per year to lay eggs? 40 kg of feed and 15 kg of greens and hay. She should receive 320 kcal from food per day, including 20 g of protein.
Now let's multiply these numbers by fifty conventional chicken heads and get an impressive figure. I won’t talk about feed prices, so it’s clear that the costs will be significant.
What do they feed quails? My father makes a mixture of special feed, mineral supplements and fresh vegetables for them. In general, the consumption per day is small. As a basis, I will take 8 cages with birds, each of which contains an average of 25 quails.
In this situation, it turns out about 6 kg for all cells per day. In my opinion, this is quite a bit.
Let me remind you that ONE chicken eats 40 kg of dry food per year! What if there are fifty of them?
In addition to the mixed feed, the father feeds the birds with fresh grass, shell rock and eggshells. Yes, yes, waste-free production is achieved. Very comfortably.