Types of incubators and the most general rules for their manufacture
An important positive feature of home-made incubators based on individual projects is that they can be made from a wide variety of auxiliary materials and previously used structures.
Of course, only from those that meet the strict sanitary requirements for effective and healthy breeding of young poultry. At the same time, the fairly common practice of producing such devices by private poultry farmers themselves shows that, as a rule, they choose an option from the four most popular varieties of homemade incubators.
- Products from an old non-working refrigerator.
- Products made from cardboard boxes.
- Incubator made of foam sheets.
- Incubator made of plywood (wooden boards).
However, the “homemade” status of compact incubators makes it possible to expand this list, giving any poultry farmer the opportunity to show all his technical imagination and ingenuity. Note that the correct choice of dimensions of the future incubator is of great importance. In this case, a number of factors should be clearly taken into account, first of all, the planned volume of laying eggs and the installation points of lamps for heating the incubation chamber.
Incubator size
For successful high-quality production of an incubation device, its dimensions must be calculated (planned) in advance. Meanwhile, this parameter depends on the production volumes targeted by the poultry farmer and on the number of eggs placed in the incubator at one time. Moreover, the second factor is decisive.
An incubator of medium dimensions (length - 450-470 mm, width - 300-400 mm) holds the following approximate number of eggs:
- goose – up to 40 pcs.;
- duck (turkey) – 55 pcs.;
- chicken – 70 pcs.;
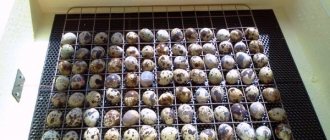
- quail – 200 pcs.
In addition, the dimensions of the device are influenced by the type of heating system and the location of the incandescent lamps. The material from which the device is supposed to be made is also important for determining the dimensions.
How to determine the optimal incubator size?
- In order to complete the design preparation as accurately as possible, you will need drawings with specified dimensions. For a clear example, below is a version of the drawing of a product, which has a relatively small volume (for 45 eggs), a length of 40 cm and a width of 25 cm;
- when calculating the optimal size of the incubator, it must be borne in mind that at a distance of 2 cm from the egg, the thermometer should show 37.3 - 38.6 degrees Celsius;
- Most often, poultry farmers in their households make devices designed for hatching young birds, which are designed to lay up to 100 eggs. In this case, the cells for eggs are made with a diameter of 45 mm and a depth of 60-80 mm;
- the result is a structure measuring approximately 60x60 cm and weighing about 3 kg. By the way, it can be made quite universal. For this purpose, replaceable grid trays with cells of different sizes are provided, thanks to which, if desired, the same incubator can be easily converted to accommodate not only chicken, but also duck, goose, turkey and quail eggs.
To accurately calculate the dimensions, you can use the following table:
when choosing blanks, any of the materials suitable for the incubator must have a dry surface, free of dirt, dyes and fats, not contaminated with mold (fungus); Regardless of the material, the assembly and cladding of the frame should be done in such a way that there is no further heat leakage from the chamber
To do this, first of all, all possible cracks are carefully sealed with sealant;
it is important to provide in advance a place in the incubator for water baths (with its help, the optimal level of humidity will be maintained);
Sufficient heating inside the structure is provided by 4-5 lamps with a power of 25 W each. To distribute heat evenly throughout the chamber, it is recommended to place one of the light bulbs at the bottom of the incubator; the incubator must have several exhaust holes; control of the incubation process is impossible without a good thermometer and an observation window mounted in the upper wall of the device.
Automatic egg turning
In order to successfully carry out the incubation process, the eggs must be rotated 180 degrees. If you do this manually, it takes a lot of time. Automatic rotation is used for this purpose.
Types of automatic turning mechanisms:
- 1. Mobile mesh. Typically used in small structures. The principle is that the eggs lie in cells, and under them there is a grid that moves slowly. As she moves, the eggs begin to rotate. The disadvantage is that they may not turn over, and the grid will go idle.
- 2. Roller system. It is less commonly used in DIY production. The system consists of rollers with bushings on which a mesh is stretched. It is difficult to make this at home.
- 3. The tray is tilted at an angle of 45 degrees. Eggs located in cells do not roll off. But when moving, the grids begin to rotate.
The latter method has found application in large incubators made from a refrigerator.
Having a household, it is beneficial to have a small device for hatching young animals. There is no point in purchasing an industrial version, which is expensive. A self-made device will fully comply with the necessary requirements and size of the farm. The costs of its repair are minimal.
Other options
In addition to the considered options for basic microcircuits, there are many electronic components on which you can build a reliable and durable device - a timer.
Among them are:
- MC14536BCP;
- CD4536B (with modifications CD43***, CD41***);
- NE555, etc.
Some of these microcircuits have now been discontinued and replaced with modern analogues (the electronic components production industry does not stand still).
All of them differ in secondary parameters, an expanded range of supply voltages, thermal characteristics, etc., but at the same time they perform all the same tasks: turning on and off a controlled electrical circuit according to a given program.
The principle of setting the working intervals of the assembled board is the same:
- find and short-circuit the “pause” mode resistor;
- use the “operation” mode resistor to set the desired blinking frequency of the diode;
- unlock the pause mode resistor and measure the exact operating time;
- set divider parameters;
- place the board in a protective case.
When making a tray turn-over timer, you need to understand that this is, first of all, a timer - a universal device, the scope of which is not limited solely to the task of turning the tray over in an incubator.
Subsequently, having gained some experience, you will be able to equip heating elements, lighting and ventilation systems with similar devices, and later, after some modernization, use it as the basis for automatically supplying feed and water to chickens.
Did you know?
Many people believe that the yolk in an egg represents the embryo of the future chicken, and the white is the nutrient medium necessary for its development.
However, in reality this is not the case. The chick begins to develop from the germinal disc, which in the fertilized egg looks like a small light-colored speck in the yolk. The chick feeds mainly on the yolk, while the protein is for the embryo a source of water and useful minerals necessary for normal development. Thank you for your opinion!
Write in the comments what questions you have not received an answer to, we will definitely respond!
Already helped 11 times
, current
question for both amateur poultry farmers and professional farmers.
Industrial
The devices often have
a high
price, and their use
is impractical
in
small
household plots.
For breeding poultry in small
homemade
is quite suitable .
anyone
can design it if they wish .
Styrofoam incubator
The most popular and convenient material for installing an incubator is polystyrene foam. Its cost is very low, moreover, the sheets have excellent thermal insulation characteristics, and the resulting structure will not be very bulky and heavy.
Making an incubator from polystyrene foam
You need to take a foam sheet of a suitable size and divide it into 4 identical pieces, from which the sides of the incubator will be made. The second sheet is divided in half, and one is divided into two, so that one sheet has a width of 60 cm, and the second 40 cm. The bottom is made from a 50x40 cm blank, and the lid is made from a 50x60 sheet. A 12x12 cm hole is cut in the lid for a window and covered with glass or plastic. The four parts are glued together to form a box, and after the glue has hardened, the bottom is attached. The sheet is carefully smeared with glue along the edge and then inserted into the main workpiece. After making the box, it must be covered with tape to make the structure rigid. Now the bars are cut out from the same polystyrene foam and have dimensions of 6x4 cm (height and width), they are glued inside the box on the bottom along the long sides. Ventilation holes are made in short walls 1 cm from the bottom, with the same distance from each other, in the amount of three pieces
It is best to do this work with a soldering iron. Styrofoam blocks are glued to the edges of the lid to secure the lid more tightly. The outer part of the lid is equipped with a thermostat, and its sensor is fixed inside at a distance of 1 cm from the eggs. When installing trays with incubation material, it is important to remember that the distance between them and the walls should be from 4 to 5 cm, and that ventilation is carried out in normal mode.
Homemade incubator with your own hands with a revolution: video
As you can see from the article, making an incubator with your own hands is quite simple. Such devices have different dimensions and equipment, it all depends on how many chicks are planned to be hatched. Before installing the machine, you need to carefully think through the project so that you get a working unit.
Homemade incubator timer with your own hands on the K176IE5 chip
Most electronic devices, such as the incubator timer in question, have been known since Soviet times. An example of the implementation of a two-interval timer for incubating eggs with detailed instructions was published in the magazine Radio, popular among radio amateurs (No. 1, 1988). But, as you know, everything new is well forgotten old.
If you are lucky enough to find a ready-made radio designer based on the K176IE5 microcircuit with an already etched printed circuit board, then assembling and configuring the finished device will turn out to be a simple formality (the ability to hold a soldering iron in your hands is, of course, highly desirable).
Let's look at the stage of setting time intervals in more detail. The two-interval timer in question provides alternation of the “operation” mode (the control relay is turned on, the incubator tray rotation mechanism is working) with the “pause” mode (the control relay is turned off, the incubator tray rotation mechanism is stopped).
The “work” mode is short-term and lasts between 30–60 seconds (the time required to rotate the tray to a certain angle depends on the type of specific incubator).
Important!
At the stage of assembling the device, you should strictly follow the instructions to avoid overheating in the soldering areas of electronic semiconductor components (mainly the main microcircuit and transistors).
The “pause” mode is long and can last up to 5 or 6 hours (depending on the size of the eggs and the heating capacity of the incubator.)
For ease of setup, the circuit includes an LED, which will blink at a certain frequency while setting time intervals. The LED power is adjusted to the circuit using resistor R6.
The duration of these modes is adjusted by timing resistors R3 and R4. It should be noted that the duration of the “pause” mode depends on the value of both resistors, while the duration of the operating mode is set exclusively by resistance R3. For fine tuning, it is recommended to use variable resistors 3–5 kOhm for R3 and 500–1500 kOhm for R4 as R3 and R4, respectively.
Important!
The lower the resistance of the timing resistors, the more frequently the LED will blink and the shorter the cycle time will be. Adjusting the “work” mode:
- short-circuit resistor R4 (reduce resistance R4 to zero);
- turn on the device;
- Use resistor R3 to adjust the blinking frequency of the LED. The duration of the “work” mode will correspond to thirty-two flashes.
Adjusting the pause mode:
- use resistor R4 (increase resistance R4 to nominal);
- turn on the device;
- Use a stopwatch to measure the time between adjacent LED flashes.
The duration of the “pause” mode will be equal to the received time multiplied by 32.
For example, in order to set the pause mode duration to 4 hours, the time between flashes should be 7 minutes 30 seconds. After completing the setup of the modes (determining the required characteristics of the time-setting resistors), R3 and R4 can be replaced with fixed resistors of the appropriate values, and the LED can be turned off. This will increase the reliability of the timer and significantly extend its service life.
Preparing for work
First of all, you need to calculate the required area. A medium-sized tray (450*350 mm) can hold the following number of eggs:
- goose – 40;
- turkey or duck - 55;
- chicken - 70;
- for quails – 200.
More often, an incubator is made for chicken eggs. There is a separate table for tray sizes for them:
| eggs | Tray dimensions |
| 45 | 45x25x28 |
| 70 | 55x55x28 |
| 100 | 60x60x28 |
Cells for chicken eggs should have a depth of 60-80 mm and a radius of 22 mm.
Of course, these are approximate figures. The exact number depends on how tightly packed the eggs are and what size they are. Therefore, when drawing a diagram of an incubator with your own hands, you need to take into account the approximate number of eggs, and not the exact one. However, in most cases, when making an incubator, you have to use the materials that are at hand.
In addition, the camera has several more requirements:
- The housing must be dry and clean. The surface should not be covered with dyes, grease or mold.
- The chamber must be assembled in such a way that heat does not leak out of it in the future. For this, a sealant is used.
- Calculate the free space for the water bath in advance so that the required humidity is maintained in the chamber.
- You will need to make several holes in the housing for air ventilation.
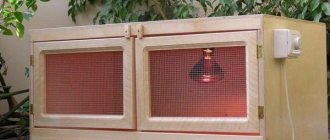
To create a homemade incubator with your own hands, you will need the following components:
- materials for the camera: refrigerator, sheets of cardboard, plywood, foam plastic;
- egg trays;
- incandescent lamps with a power of 25-40 W. A small device will need 2-3 pieces, and a refrigerator will need 4-6;
- thermometer;
- fan;
- hygrometer;
- To automatically turn eggs you will need a thermostat, a timer for turning, a gear motor, bearings with clamps;
- installation tools: pliers, saw, knife, electrical tape, jigsaw;
- sealant.
Useful tips
When making an incubation box, experienced breeders recommend adhering to the following recommendations:
- To ensure uniform heating of the grid with eggs, incandescent lamps should be installed both below and under the lid.
- For natural ventilation, be sure to make several round holes in the lid.
- Provide a backup heat source in case of a power outage. To do this, make a special chamber at the bottom, which is separated from the rest of the incubator with three-layer plywood. Drill many holes in it. Place the aluminum canister into the resulting compartment. If the electricity goes out, you need to pour boiling water into the canister, and then close all the ventilation and cover the incubator with a blanket. The heat from the homemade battery will emanate for 12-14 hours.
- Avoid sudden shocks and noise in the room, otherwise the embryos may become frightened and lag behind in development.
- Do not use outdoor thermometers to monitor temperature, as they have a fairly high error rate. The best option is medical devices. They can be installed near the eggs, but they must not be allowed to come into contact with the shell, otherwise the accuracy of their readings will suffer. To ensure accurate data, measurements should be taken some time after turning on the incubator and at regular intervals.
- If the device is large, you can use an ordinary fan, which will help maintain the temperature balance inside the chamber.
- The incubator should be installed on an elevated surface in a room where room temperature is maintained, there is no direct sunlight and there are no drafts.
Incubator from a used refrigerator
If you don’t want to buy an incubator, but the farm has an old refrigerator, then you can give it a new life. In the former food storage, the set temperature is ideally maintained, which is facilitated by the walls of the refrigerator, which have thermal insulating properties.
It’s very easy to place trays of eggs in place of the shelves, and thanks to the fastening grooves along the inner walls of the chamber, all the product loads are evenly distributed along the height of the machine. The volume of the refrigerator is enough to install water tanks underneath, with the help of which the maintenance of humidity is regulated.
Ventilation system
Any incubator should be equipped with at least the simplest ventilation system. It will carry out air exchange inside the machine, help maintain the temperature and regulate humidity to create ideal conditions suitable for hatching chicks.
The optimal ventilation speed is 5 m/sec, and a fan must move the air mass. Air holes are made (drilled) on the top and bottom of the refrigerator.
To prevent air from entering under the casing, the holes are equipped with plastic or metal tubes having the required diameter. When partially or completely blocked, ventilation is regulated.
Installation of a heating system and selection of a thermostat
The easiest way to heat the inner chamber is to use incandescent lamps (4 pieces 25W, 2 pieces 40W). Lamps are distributed evenly at the bottom and top of the machine
When installing lighting fixtures from below, it is important to remember that they should not interfere with water trays
An important part of the incubator is the thermostat; there are three types:
- bimetallic plates;
- thermometer having a mercury base and an electrode;
- barometric sensor.
With the help of the first, the electrical circuit is closed as soon as the desired temperature is reached, with the help of the second, the heating is turned off, and the third closes the circuit as soon as excessive pressure arises.
Egg turning mechanism
During the incubation process, eggs must be turned several times a day. Under natural conditions, this function is performed by a chicken, but here a special mechanism is required.
The work is performed by an electric motor, which activates a rod that transmits a motor impulse to the egg tray. To create such a mechanism you need:
- make a gearbox from the bottom of the chamber;
- make a wooden frame that will hold the trays. Fastening is carried out in such a way that the trays are tilted 60° to the door and the same in the opposite direction;
- the gearbox must be firmly fixed;
- connect the rod connected to the egg tray to the electric motor.
Sequencing
It remains to talk in more detail about how to convert a refrigerator into an incubator:
- The ceiling of the unit is equipped with holes where heating lamps will be inserted and through holes for ventilation.
- At least 3 holes with a diameter of 1.5 cm are drilled from below.
- To better retain heat, it is recommended to line the refrigerator walls with foam plastic.
- A thermostat is attached to the outer part, and the inner part is equipped with a sensor;
- To organize the circulation of air masses, 1-2 fans are attached next to the light bulbs (on top) (computer fans are also suitable);
- A small viewing window is cut out in the door of the former refrigerator and covered with glass; you can use transparent plastic.
Vertical model
The refrigerator is installed in its usual state - vertically on its legs. This arrangement allows you to place up to 6 trays in tiers. The exact number of levels will depend on the height of the refrigerator. Axles made of a metal rod are fixed to the trays in the center. Their ends rest on stops installed on the side walls of the refrigerator. On the axes, the trays tilt in both directions, and to prevent this from happening without permission, a lock is provided.
Light bulbs under the ceiling are not able to heat the entire space evenly, especially the eggs on the lower trays. To do this, place a fan on the back wall of the refrigerator. Sometimes craftsmen fit light bulbs in several places, using the upper and lower parts of the housing.
To make it convenient to monitor the temperature, cut a window in the refrigerator door with a grinder and cover it with a piece of plexiglass.
From the refrigerator
To make an incubator from a refrigerator, remove the freezer and all the shelves from it.
After drawing up the drawing and connection diagram, the following steps are carried out:
- Holes are drilled at the top. One is for ventilation purposes, and the rest are for incandescent lamps.
- In order to preserve heat, the walls of the refrigerator are lined with polystyrene foam.
- Trays are installed. If possible, the refrigerator shelves are remade for them.
- In the upper part, outside, the thermostat is installed. The sensor is located on the inside.
- 3 holes measuring 1.5 x 1.5 cm are cut at the bottom for ventilation.
- There are fans near the lamps and below. They provide air circulation.
The advantages of such an incubator are its dimensions, which can accommodate up to 500 eggs.
Incubator from the refrigerator
Characteristics of incubators with automatic egg turning
In addition to incubators with “manual” or semi-automatic egg turning, there are automatic incubators that minimize human intervention in the process of hatching chicks. According to the time set by the owner, the automation itself performs the required revolution, and the eggs do not lie in one place.
Such machines can be built at home, but first of all, it is important to take into account all its possible pros and cons
Advantages
- The following features can be considered the undeniable advantages of a homemade device:
- low cost compared to ready-made purchased models;
- economical in terms of energy consumption;
- independent selection of the required internal volume, depending on the personal needs of each farmer;
- high maintainability (if any part fails, the technician can always replace it without outside help);
- versatility (if the structure is properly assembled, a homemade incubator can be used not only for breeding chickens, but also for breeding chicks of other domestic or even exotic birds).
In addition, if the components for the future device can be found at home, then you will get the finished incubator completely free of charge.
It will also be useful for you to learn how to make an incubator from a refrigerator with your own hands.
Flaws
This group of characteristics mostly includes disadvantages associated with inaccurate calculations and the use of old materials.
- Therefore, the possible disadvantages of homemade devices are as follows:
- the possibility of failure of some part of the device (especially if the incubator is made from old equipment);
- independent increase in temperature or power outages, which leads to the death of embryos;
- unattractive appearance;
- lack of a warranty from the manufacturer that allows you to replace the device if it breaks.
Pros of homemade designs
Homemade incubators have a number of positive aspects:
- Designed for local conditions, taking into account climate and structural features;
- Possibility of assembly from available materials, according to your own measurements;
- They are distinguished by economical energy consumption;
- Reliability in use;
- Capacity. Some designs for home use hatch several hundred eggs at once;
- In such containers the survival rate is 90%. Chicks are no different from those hatched under a hen;
- The versatility of the device allows you to produce poultry of different breeds, including exotic ones (chicken, geese, parrots, ostriches).
How to determine the optimal incubator size?
- In order to complete the design preparation as accurately as possible, you will need drawings with specified dimensions. For a clear example, below is a version of the drawing of a product, which has a relatively small volume (for 45 eggs), a length of 40 cm and a width of 25 cm;
- when calculating the optimal size of the incubator, it must be borne in mind that at a distance of 2 cm from the egg, the thermometer should show 37.3 - 38.6 degrees Celsius;
- Most often, poultry farmers in their households make devices designed for hatching young birds, which are designed to lay up to 100 eggs. In this case, the cells for eggs are made with a diameter of 45 mm and a depth of 60-80 mm;
- the result is a structure measuring approximately 60x60 cm and weighing about 3 kg. By the way, it can be made quite universal. For this purpose, replaceable grid trays with cells of different sizes are provided, thanks to which, if desired, the same incubator can be easily converted to accommodate not only chicken, but also duck, goose, turkey and quail eggs.
To accurately calculate the dimensions, you can use the following table:
Why is it necessary to turn eggs?
If you neglect the timely and regular turning of eggs, they will not hatch into strong and healthy quail offspring.
If you dive into biology, you can understand that the yolk has a lower specific gravity than the white. Accordingly, it will always rise up. And if the testicle lies on one side all the time, then the embryo runs the risk of sticking to the shell and dying.
Farmers say that quail eggs need to be turned at least four times a day, that is, every six hours.
Thus, the entire egg is warmed up evenly, the organs of the future embryo develop gradually, and the correct position of the embryo is ensured by the end of incubation.
Manipulations with hatching eggs increase not only hatchability, but also the health of the entire quail population.
Experiments were carried out that showed that eggs that never turned over gave 15% of the offspring. While two knocking turns provided 45% of hatchability, and six turns provided 85%.
It is worth noting that the hatching of quails was not affected in any way by which coups began: from the first or third.
How to make an incubator at home: learning the important nuances
Factory-made models are, without a doubt, convenient and practical devices, but not everyone can afford such an expensive pleasure. Making a simple incubator for quails or chickens with your own hands is not so difficult. Its main components: housing, heating and ventilation system, turning device. Let's consider the basic requirements for them.
Requirements for the housing of the incubation device
The most important thing is that the body of the structure must maintain the temperature required for hatching chicks. The second significant point is ease of maintenance. From time to time you need to open the device, check the operation of the heating elements, and ventilate the masonry.
The horizontally located case is very convenient in this regard: the lid opens upward, freeing access to all parts of the structure
And the last requirement for the case is suitable dimensions. The eggs should not lie tightly, the distance between them should be at least a centimeter. This arrangement of the masonry ensures good ventilation and uniform heating.
How to heat masonry and control the temperature
Only the optimal temperature guarantees the appearance of chicks
Even small deviations can ruin everything, which is why it is so important to choose the right heating element for the incubation structure
The heater can be mounted above the tray with eggs, under it or along the perimeter of the clutch. It should work without interruption and heat the tray evenly
What heating elements can be used for an incubator:
| Heater type | Features of use | Average price (as of July 2022), rub. |
| Lamp | The lamp is easy to replace and install; such devices are always available in the household. A significant drawback of this element is uneven heating. Constant light is an unusual environment for hatching chicks. | Incandescent lamps – 45. Ceramic lamps – 650. |
| heating elementnew | The built-in heating element evenly distributes heat in the cavity of the incubation device. The disadvantage of this heater is that it is difficult to replace and the need to specifically keep a spare one on hand if a breakdown occurs. | 400 |
| Infrared | This is the most economical type of heater. IR film distributes heat evenly throughout the tray. Changing such heaters is not easy and it is better to invite a professional for this task. | 900 per sq. m. |
How to arrange ventilation in an incubator
Good ventilation ensures even heat distribution throughout the incubator. In stagnant air, the eggs overheat and the embryos die from lack of oxygen.
Ventilation in the incubation device can be continuous or intermittent. In the first option, the heat is evenly distributed throughout the tray.
To perform this task you do not need a powerful fan; for home purposes, an incubator fan can be made from a regular computer cooler with a diameter of 80 mm or more
Mechanisms for turning eggs
The bird in the nest periodically turns the eggs over. This must also be done in the incubator to ensure uniform, full development of the embryos. According to the rules, eggs should be turned every 3 hours. In a small incubator for a hundred eggs, this can be done manually, but in devices for 200 or more eggs, you need to install an automatic rotating mechanism for the incubator.
Automation for this purpose can be frame or inclined. For medium-sized incubation devices, it is preferable to use a frame system: it is easy to operate and economical. But remember: with sudden movements, the egg frames may break.
Inclined systems are suitable for eggs of all sizes and are safe
But such devices consume more energy and require complex maintenance. They are installed in large incubation stations.
Optimal sizes of a home incubator for eggs
The dimensions of the incubation structure directly depend on the tasks that you are going to assign to it. For a small farm, it is optimal to choose a design with 100-120 cells. You can use all of them or just some of them depending on your need.
The cell diameter for each egg is 4.5 cm. The cell height is at least 6.5 cm. It is convenient if the grid can be changed for larger or smaller eggs
Related article:
How to turn an old refrigerator into an incubator
You shouldn’t hastily get rid of your broken refrigerator; you can give it a second life, but as an “artificial hen.” The creators of such a familiar household appliance made sure that the desired temperature was maintained inside thanks to heat-insulating walls.
Incubator from an old refrigerator
Shelves with racks can be easily converted into egg trays. The laying of the material will be uniform if you use the grooves for fastenings located along the inner walls. Water containers are installed at the bottom to help maintain humidity. A description of everything that should be in the incubator is presented below.
Ventilation system
Each factory model, as well as DIY refrigerator incubators, must have ventilation
The condition of the air inside the car, as well as the temperature and humidity, depends on this important system. Thanks to all these combinations, an ideal microclimate will be created, suitable for hatching chicks
The optimal option is an air speed of 5 m/sec, which will be provided by a running fan. You will have to drill holes at the bottom and top of the case for air circulation.
Ventilation diagram in the incubator
Heating system
The simplest heating system consists of ordinary light bulbs. They are evenly distributed below and above the structure (inside, of course). There is only one requirement for the lower bulbs: they should not interfere with water containers that act as humidifiers.
A thermostat for the incubator will help maintain a suitable temperature. It is customary to use three types at once
- bimetallic plates;
- mercury thermometers equipped with electrodes;
- barometric sensors.
One is responsible for closing the electrical circuit as soon as the required temperature is established. Thanks to the second, heating stops. The third closes the circuit if increased pressure occurs. To monitor the indicator, it is most convenient to use temperature sensors.
Heating circuit
How to flip eggs
In a do-it-yourself egg incubator, just like in standard models, turning the eggs is mandatory. The process can be either manual or automatic, the second is more convenient.
The mechanism works very simply. Thanks to the actions of the electric motor, a motor impulse is received through the rod, which moves the trays. You can make an egg incubator with automatic egg turning yourself:
The gearbox is installed below. The mounted wooden frame will hold the trays, secured in such a way that they tilt 60 degrees towards the incubator door and the same amount in the opposite direction towards the wall. It is important to remember to securely secure the gearbox. The electric motor is connected to a rod, one end of which is connected to the egg tray.
Horizontal model
The refrigerator is placed on the back wall with the lid up. In this position, the incubator takes up a lot of space in the room, but the absence of tiers of several trays inside allows you to accurately maintain the temperature regime over all the eggs.
The manufacturing steps are similar, only they make one large tray for the entire area of the refrigerator. The bulbs are hung evenly so that they heat the entire area. A fan must be installed, since the incubator has a large volume.
Styrofoam incubator
This is most likely the most budget option; for production you will need sheets of foam plastic. The main advantage of this option is the excellent thermal insulation properties of the material.
Select the desired dimensions, taking into account the number of eggs to be laid and additional space for heating and lighting.
There is no need to install complex heating systems. Since the box has excellent thermal insulation, it can be used to heat 20 W light bulbs.
They must be mounted in the lid of the box, the eggs must be at a distance of 20 centimeters from the light bulbs.
Check it out here too!
- Do-it-yourself barbecue from a gas cylinder: step-by-step instructions, choosing the optimal sizes and tips for choosing projects (110 photos)
- Do-it-yourself winter chicken coop: design, layout, insulation, heating. 80 photos of warm chicken coops
- How to make a snow blower with your own hands: manufacturing methods, diagrams, drawings, construction options and application nuances (100 photos + video)
It is not recommended to open our incubator frequently, so you need to think about turning the eggs. Of course, you can make an automatic incubator with your own hands, but this is a rather complex option for our simple design.
The best solution in this situation is to go to the store and buy inverted trays. Such trays are not expensive; the handles for turning over can be brought out.
This way we can turn the eggs, and the temperature in the incubator will remain the same.
Check it out here too!
- How to make a pump with your own hands - step-by-step manufacturing of a pump and options for making simple and effective pumps (95 photos + video)
- Do-it-yourself hot smoked smokehouse: 100 photos, review of the best drawings, project selection and construction options
- How to make a cage for a parrot: basic requirements, tools and materials, step-by-step photo instructions. Tips from experts on arranging a cage
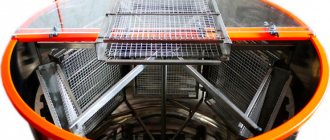
Self-assembly of a multi-tier incubator
taken from the tile insulation of the iron
To maintain a comfortable temperature in a chamber of this type, you need to take a relay equipped with an automatic contact measuring device.
This incubator has the following parameters:
- height 80 centimeters;
- depth 52 centimeters;
- width 83 centimeters respectively.
The construction looks like this:
- the frame is made on the basis of pine bars 40 mm long;
- the bars are covered on all sides with plywood with a thickness of 3 mm;
- the free space between the block and the plywood is filled with dry shavings or sawdust; you can also take polystyrene foam to insulate the structure;
- the door in the form of a separate panel is attached to the rear wall of the incubator frame;
- hinged type canopies are used as fasteners.
Inside, the incubator is divided into three compartments by installing three partitions. The side compartments should be wider than the middle compartment. Their width should be 2700 mm, and the width of the middle compartment should be 190 mm, respectively. The partitions are made from 4 mm thick plywood. There should be a gap of approximately 60 mm between them and the ceiling of the structure. Then corners measuring 35 by 35 mm made of duralumin should be attached to the ceiling parallel to the partitions.
Slots are made in the lower and upper parts of the chamber, which will serve as ventilation, thanks to which the temperature will be the same in all parts of the incubator.
a contact type thermometer is installed
In the middle compartment, a heating device is installed approximately 30 centimeters up from the bottom. Each compartment must have a separately installed door.
For better sealing of the structure, a three-layer flannelette seal is placed under the lid.
Each compartment should have a separate handle so that each tray can be rotated from side to side. To maintain the required temperature in the incubator, you need a relay operating from a 220 V network or a TPK thermometer.
Now you are convinced that you can make an incubator for raising chickens at home with your own hands. Of course, different designs have different complexity of implementation. The difficulty depends on the number of eggs and the degree of automation of the incubator. If you do not have high demands, then a simple cardboard box will be enough for you as an incubator for raising chickens.
Thermostat
The thermostat is a very important part of the incubator. Choose a reliable digital model with a PID algorithm.
The main requirement for a thermostat is a digital one with a PID controller. The relay model will also perform its functions, but now you can find comparable cost models with more accurate algorithms.
Under no circumstances should one thermostat be used to maintain the regime in two different incubators. Unless the model has two sensors and two independent control algorithms, each incubator must have a separate thermostat.
Uncontrollable risks
A homemade incubator always carries the risk of temperature fluctuations. There is no way to insure against this.
The use of a third-party thermostat can lead to the establishment of hysteresis with a large amplitude. This is a phenomenon in which the temperature fluctuates in one range and does not settle at any value. Accidental overlap of housing geometry, thermostat algorithms and thermal insulation properties of the housing can lead to fluctuations of up to 3 degrees on either side of the set value. This regime is unpredictable and interferes with the uniform development of embryos and the establishment of a constant microclimate. Unfortunately, without preliminary experiments and tests it is impossible to insure against this. Therefore, making a homemade incubator will always carry the risk of establishing temperature hysteresis.
Step-by-step production of a foam incubator
How to make an incubator with your own hands from polystyrene foam - step by step:
- We measure the dimensions of the foam box.
- A frame is made from the bars to the size of the box. It should turn out to be slightly higher than the container that was chosen for water.
- On one side we cover the frame with prepared fabric and secure it. Ideally - with a stapler, but you can also use small thin nails.
- One wall of the box needs to be drilled - make a small hole for the light bulb socket.
- The socket is inserted into this hole and the light bulb is screwed into it. It must be installed so that it does not come into contact with the foam!
- You will also need 2 more holes in the walls of the box, and 4 in the lid. They should be small, approximately 1.5 cm in diameter.
- You need to cut a window on the lid into which the glass will be inserted. This is necessary to observe what is happening inside without opening the incubator again.
- Next, the photo frame is disassembled, inserted and reassembled. It turns out to be a glass window.
- A water container is placed at the bottom of the box. You can fill it right away.
- The previously created “screen” is installed on top of it - a frame covered with fabric. It will allow the water to evaporate freely, while at the same time the eggs will not touch the bottom or container.
- Next you need to install the humidity sensor, thermometer and close the lid.
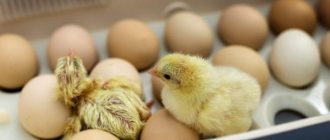
At this stage, the homemade DIY incubator is ready for use. He cannot turn the eggs on his own, but you can do it yourself 2 times a day, which is not at all difficult.
The options described above are simple. You can implement them yourself. How effective are they? The experience of other people shows that they can be used and produce a brood of chicks. The most important thing is to consistently maintain the optimal temperature. If this rule is followed, this is 80% success.
Additional functions
Hygrometer
It is very useful during incubation to control not only the temperature inside the incubator, but also the humidity. To do this, you need a special device for measuring humidity - a hygrometer. It is not necessary to choose a very accurate model; an accuracy of 3-5% and a measurement range of 30 to 85% are sufficient. You can place the hygrometer sensor directly on the tray or near the thermostat sensor. Do not allow it to get wet or be too close to water.
12V power supply
With a 12V power supply, when the power goes out, the incubator can draw energy from a car battery.
By using all electronics that operate on 12V and a power supply through which you can supply power from a 220V network, you will be able to connect backup power from a car battery. Users quickly get used to this feature of the incubator and many will readily confirm that backup power saves a lot of nerve cells.
Adding this feature to an already running incubator would require replacing all the electronics or using an inverter, which is expensive in any case. Therefore, it is better to provide power from 12V right away.