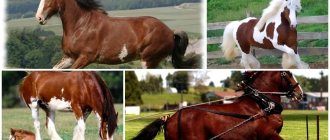
For every farmer, sooner or later the question of how to make a sleigh for a horse becomes urgent. Even now, in the age of advanced technology, this animal remains indispensable for rural areas.
For every farmer, sooner or later the question of how to make a sleigh for a horse becomes urgent.
Now you can find a lot of offers. Among the winter carts are Russian sleighs, cross-country carriages, covered carriages, and even all sorts of exotic options reminiscent of ancient peasant logs. But paying a huge sum for something you can create yourself is unreasonable.
Types of sleds
- cross-country - light sleds used for training trotting breeds of horses;
- cart - a closed version with a seat and back;
- drags are poles tied to a horse, and a load is already placed on them; when moving they drag along the ground;
- drovni - a sleigh without a body;
- sledges - sleighs are wide and very low;
- chunki - cargo version;
- urban - light, tall, with a narrow runner, intended for one or two people;
- European ones - with brakes.
Based on materials:
Nowadays, they mainly use different materials in manufacturing to make the structure cheaper and more reliable.
Features of choosing sizes and materials
It is possible to make a sleigh, but it will take quite a lot of time and your skill. If you are a carpenter, welder and jack of all trades, then you can safely start. It’s better to take an assistant - it will be more fun and easier.
Decide what kind of sled you need. Choose the material from which you will make the winter cart and the components - the weight of the finished sleigh depends on this. It is important to make a drawing in advance and calculate the main parts.
The simplest sled consists of runners and a seat monolithically connected to each other. Traditional wood for sleds includes oak, willow, elm, birch and bird cherry.
Drawing
The size of the sled depends on many factors. For example, the width of the runner depends on the road on which they will drive. The spread of the runners must correspond to the track of the road. And the looser the snow, the wider the runner. The height of the sleigh and its size depend on the breed characteristics of the horse and the height of the road track.
For an average horse you can take the following sizes:
- length – 1.8 m;
- width – 1.25 m;
- height – 0.3m;
- width between runners – 0.8 m.
Below is a universal drawing of a wooden sled with a metal strip on the runners.
Materials
Skids can be made of wood or metal. On wooden ones, you can attach a metal strip at the bottom for better adhesion to the surface.
The wood for the runners must be prepared and processed in advance. You can make metal runners yourself by welding or order them from a craftsman.
The easiest way to make runners is to take a pipe and bend it as required by the design.
Required additional materials:
- metal pipes, sheets, angles, profiles;
- plywood sheets;
- wooden boards;
- metal bolts;
- wooden wedges;
- wood varnish, metal paint;
- woodworking tools;
- welding machine.
Final stage
Now the work is almost complete, almost all the material has been used up. But there were a few cans of paint and varnish left. Now we need to paint this cart. Before you start painting and varnishing, you need to get rid of unevenness and roughness.
You can choose the color according to your own preferences. You can paint it in neutral shades or make your cart bright and visible from afar. Or you can simply varnish the wood. This way the winter cart will look authentic.
You can choose the color yourself.
After cleaning and painting, all that remains is a test harness. You should not load the cart before running it in, you just need to harness the horse and ride a few kilometers to check how the sled behaves.
If there are several horses on the farm, then you can try running a cart pulled by different horses.
Manufacturing
Step-by-step version of assembling a winter metal sled:
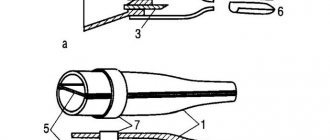
- We make runners. We take 2 iron pipes (stainless steel) with a diameter of 30–40 mm. If the length of the sled is 1.8 meters, the pipe should be 2.8 meters, taking into account bends. Using a pipe bender, we bend the pipes equally from the front side and bend them 20 cm from the back side - for moving backwards.
- We weld a 4 cm wide metal strip onto the runners. It will serve for stable movement in the snow.
- Manufacturing of racks and crossbars. The number of racks depends on the weight of the cargo you are going to transport. Let's take 8 racks (4 on each side) and 4 crossbars. Pipes with a diameter of 10 mm are connected by welding to each other and to the runners. The height from the runners to the junction with the crossbars is 20-30 cm. When attaching the racks to the runners, keep in mind that the outermost rack should not be on the edge of the runners. Subsequently, this can lead to a break in the runner.
- Making fillies. Fillies 10-20 cm long are cut from the pipe. They are welded to the runners and crossbars.
- A transverse strip with loops and hooks is welded onto the shaft.
- Making flooring. A very simple option is to take a plywood sheet. Cut to width and connect with metal bolts to crossbars. You can take a metal sheet and weld it to the crossbars and racks, but this will make the structure much heavier.
- Paint it.
Exercises to accustom a horse to a sleigh
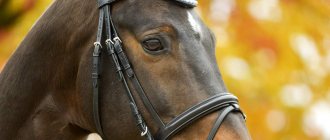
You won’t be able to harness a horse to a sleigh right away when you want to. The horse may get scared and then not get into the sleigh. You need to train carefully and patiently.
The horse must be a draft horse - a working horse, trained to yield - to reverse.
Moreover, it should settle evenly, straight.
- First, walk with your horse around the sleigh. You can put some hay, harness, and arc in them. The horse must get used to it and get acquainted with a new object.
- Once the horse gets used to it, make the sled moving. Once you get the horse's attention, start moving them back and forth.
- Start leading the horse into the shafts forward towards the sleigh. If there is hay there, it will simplify the task. The horse will reach for food. Try to get her to go there herself. This way she will get used to the narrow space of the shaft.
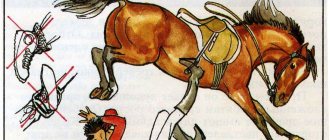
- For the horse to see, sit in the sleigh, move away from it, come up again, sit down, jump, do something in it. Make some sounds, make some noise, but be careful - the horse may jerk sharply and run away. We teach her that there is a person in the sleigh and he does something in it.
- The next step is to teach the horse not to be afraid of the sled approaching from behind. We fasten the reins of the horse and slowly roll the shaft with the sleigh onto the horse. Then we use the shafts to touch different parts of the horse’s body from different sides.
- We teach the shafts to fall. Let's take the shaft in our hands; the horse should see it. Let's move back a little for safety reasons. We lift it half a meter from the ground and throw it. At the same time, be careful - the horse may jerk and jump to the side the first time.
- The second time we raise the shaft higher and throw it again. The horse must see that it is not causing him any harm. We praise our horse and talk to it. We do this exercise until the horse does not react to the fall of the shaft.
The process itself
The process of harnessing a horse consists of the following steps.
- First you need to put the bridle on the horse. Heat the bit in your hand so that it does not damage the animal's mouth.
- Take the harness in your left hand, and the horse’s neck in your right hand and place it on the horse so that the saddle is in the right place. Adjust the horse's mane and harness so that they lie flat on the animal.
- Then we tighten the girth so that the animal’s stomach is not too compressed.
- Place the collar over the horse's head.
- Bring the horse into the shafts and secure it. Attach the arc in parallel.
- The shafts must be attached to the nurse's loop.
- You need to tighten the clamp on the clamp.
- Check how you secure the arches, as this will affect whether the animal will be in pain when pushed.
- Fasten the reins to the bridle.
- When you harness three horses, then the side harnesses of the horses need to be fastened to the harnesses.
It is important to double-check how you have harnessed your horse so that the sled does not tip over or become unharnessed while riding. Moreover, the harness should not cause pain to the animal.
How to harness a horse correctly
Typically, Russian sleighs are very similar in structure to a cart. They are equipped with shafts and an arc. That is why their method of harnessing a horse is completely the same. In cases where it is necessary to harness three horses , a three-piece harness is used, in which the root horse is necessarily harnessed to the shafts, and the other two horses are fastened to harnesses.
But it should be noted that in Ukraine sleds were used by workers with a combined drawbar and drawbar harness. The main difference between such a harness is the simplest design, in which instead of a shaft, only a drawbar is used, located in the middle of the sleigh, and the horse is fastened by the lines.
The order of harnessing the horse is as follows:
- Similar to the case with the cart, the bridle must be put on the horse first. But in winter, it is necessary to warm the metal bit in the palm of your hand so that at very low temperatures it does not injure the delicate tissues of the horse’s mouth.
- Next, a harness with lines is put on the horse’s body. It is necessary to bring the horse to the front of the sleigh to the right of the drawbar, and then fasten the lines to the specially threaded rings.
- A specially made chain or belt, which is usually called a drawbar strap, is put on the horse’s head and is located in the narrowest part of the neck. This place is located just behind the horse's head.
- At the end, the reins are fastened and the horse-drawn sleigh can be considered ready for use.
Basic principles of construction
Despite the fact that Russian sleighs are very diverse, they all have the same structural principle. Their main part is the strips curved along the edges at the bottom of the box. Their usual length when folded is 2 m. 25 cm, and their height is no more than 80 cm. The track width between them is 57 cm.
In addition to the sliding strips, the main parts of such carts include a frame, a shield, a rolling pin, and shafts. All parts must be properly fastened together.
Detailed instructions for making a sleigh for a horse with your own hands
The most important and complex element in a horse-drawn sleigh is the runners. It is best to make them from metal to speed up the assembly process. Plain carbon steel or stainless steel is ideal. High-quality runners are best made flat forged from a single sheet of metal, but very often they are made from ordinary metal pipes. To bend them correctly, you will need to use the help of other people or special devices.
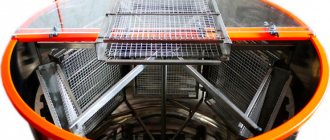
After the final production of the runners, you can proceed to assembling the base of the product. It consists of transverse posts and crossbars located on both sides. They are made from metal profiles or pipes. Absolutely all structural elements must be securely fastened using a welding machine.
Don't forget to equip your horse-drawn sleigh with good brakes. This is quite easy to do once the runners are already made. The brakes are special pads consisting of rubber with a lever. Such brakes can be used as parking or running brakes.
Next, it is necessary to weld metal plates to the front part, onto which the shafts will subsequently be attached. After completing the manufacturing of the chassis, you can begin to build the body of the sleigh. It is made of wood and comes in a wide variety of designs. Make a sketch or drawing for this. This will help bring the most daring decisions to life. After making the body, its inside and bottom can be covered with sheets of plywood, and the top can be covered with felt or leatherette. At the end of the work, the wooden shafts are fixed and the horse-drawn sleigh can be considered ready.
It is difficult to imagine village life in the outback of our country without a faithful and reliable assistant - without a horse. Therefore, here you will need both a cart and a sleigh for the horse in winter, when it gets snowy. You can bring cargo on horseback, firewood from the forest, plow your garden, and just go to the market off-road. Previously, almost every village had a cart and sleigh maker. And today you will have to either buy them or make them yourself, which we will talk about in our article.
How to make a cart?
Tools and materials
Making a sleigh with your own hands
Tools and materials
Video “How a sled is made”
Comments and Reviews
Advantages of installing seats on aluminum skids in a minibus.
The seat mounting guides make it possible to move the passenger rows if you need to free up space for luggage, or to simply dismantle the seats. This is necessary if there is a need for instant redevelopment from a multi-seat excursion bus into a comfortable minivan for transporting delegations. Aluminum skids make cleaning the interior of the minibus easier.
Install the minibus seat slides yourself.
There are two varieties:
The external type of slide is installed on top of the floor covering or on the side of the cabin, protruding from the surface by 15 mm. The internal slides for the seats are cut into the laid plywood and transport linoleum, forming a flat floor plane. Furniture bolts or 5 mm embedded plates with cut threads are placed in the grooves of the slide, and seat posts are subsequently mounted to them.
As mentioned in the previous part, Seats, part 2 (Making bucket mounts). I wish the driver's seat had longitudinal adjustment. To implement this idea, we bought a sled from Alexey a long time ago, with the adjustment we needed, from Opel (like from Astra).
The sled was new, as if it had just come from the store, and I had to ruin all this pristineness. And - very radically. Unfortunately, I didn’t take photos of the process of cutting off excess or approximate fittings. Before starting cutting, I made a kind of conductor for the slide from thick plywood. I screwed it to it and the grinder was used. Anything that clearly would not be used was mercilessly removed. The main thing here was not to cut off too much, since it was necessary to screw the “draft” versions of the seat mounting plates to something. Yes, yes, that’s right... Of course, making the “rough parts” took a lot of time, plus trying on the seat itself, but I chose exactly this option. There was more than enough cutting, drilling and grinding to do. I haven’t cut off the standard reinforcing tubes in the sled yet; I decided not to do it unnecessarily for now. For the first test option, on the slide, in the remaining parts of the standard seat mounts, I drilled holes similar to those drilled in the “rough plates,” screwed them through them and installed the seat.
Well, well, the most interesting thing is, we take the keys and the bucket and go to the car. Attempt number one - we put the seat in Eight... We sit down and see what happened. What happened is that the bucket needs to be placed much lower than it is at the moment. There is a reserve up to the ceiling, but it is not enough - taking into account the installation of pipes for attaching the bucket, there will be none at all... By the way, the Mentor was not very happy with the “First option”. Having received proper recommendations and adjustments from him, I began work. Remove... Cut, sharpen and drill again. This time we had to remove the transverse reinforcement tubes, and in general everything that prevented the bucket from being secured in the lowest position. After all this, you can try on the seat again.
Second attempt... Hmm... Better, and much more) But still not the same... We need to go even lower. At this stage I even cut off the slide adjustment lever. It was also necessary to radically alter the plates to which the seat is screwed. When everything was prepared, we tried on the bucket again. The result is only slightly better than in the second attempt. BUT, the Mentor and I are already starting to be satisfied with the result)) Alexey suggested trying to fix the bucket even lower... Let's try - there is still a small margin.
Another refinement of the plates, re-drilling the holes in the last ones, a little more trimming of excess metal and... Trying on again! I sit down. Great! The headroom to the ceiling is decent! That's it - we are waiting for the Mentor so that he can also try the result of the fourth attempt. The next day, Alexey approved and approved the result. Hooray! All that remains is to make a final version of the mounting plates, with the required number of adjustment holes, attach them by welding and make reinforcements for the rigidity of the structure) Actually, this is what I did after work and on the weekends. I finished everything and tried on the bucket - just what I needed!
We are pleased with the result - the idea was a success!
Below is a photo of the start of welding work, so don’t be surprised if you see unwelded areas...
How to make a cart?
A horse cart is a separate type of horse-drawn transport and has several types. That is why you need to immediately decide, before making it yourself, for what purposes and what type of cart you need. If this is exclusively the work of transporting goods, then it will be enough to have a dray or a cart of the type of platform, that is, without sides with a regular flat bottom. If you need to transport hay and other materials on a cart and use it as a vehicle, then you need to do it with sides.
It is also worth immediately foreseeing how many horses you will harness to the cart. The fact is that a single-horse and a double-horse cart differ in nature and manufacture. Single-horse in Russia has shafts and an arc, and double-horse has a drawbar. If you make the Ukrainian version, then a drawbar cart or cart is used for both one horse and a pair. Note that it is easier to make a drawbar cart with your own hands than an arc cart.
Important points
Before you start making it, you should know a little about the design of the cart and its main parts. So, the main element of any cart is its chassis. And these are two axles (front and rear), wheels and the frame itself on which the body or platform is mounted. There are also struts that act as shock absorbers. In this case, the rear axle is made stationary, that is, without movement, and the front axle is turning, due to this the rotation will be carried out.
The next important elements are the shafts in a curved one-horse cart or the drawbar in a double-horse cart (Ukrainian cart). The shafts and drawbar are attached to the front axle, as they allow the front wheels to turn. It is advisable to make the frame welded metal, since the entire load of the cart will go on it. The cart itself is made of wood.
As for the sizes, previously the standard cart width was about 1.5 meters and the length was 3 meters. The height depends on your desire and the size of the horse, but the standard is from 0.5 to 0.7 meters.
Tools and materials
- Wooden boards;
- welded frame and wheel axles;
- welding machine;
- 4 wheels (car or motorcycle);
- metal pipes or U-shaped profile;
- nails;
- hammer;
- woodworking tools (saw, hacksaw, sandpaper, sander);
- other tools as needed;
- blueprints.
Making a sleigh with your own hands
Anyone can buy a sled, but it will not be affordable for everyone, since their cost is quite considerable. Well, all that remains is to do it yourself. Moreover, sleighs were people's favorite transport. Watch the video by pashinkirill about this.
Tools and materials
Before making a sleigh for a horse, you need to decide what material the most important part will be made of - the runners. They can be metal or wood. If you want to make it from wood, you will need special skills and knowledge in preparing the wood and bending it. It’s easier with metal; here you only need to forge the runners in the workshop.
- Wooden boards;
- plywood;
- sheets of metal;
- corners or metal profile;
- metal pipes;
- varnish, paint;
- woodworking tools;
- other tools as needed;
- blueprints.
Step-by-step instruction
- The very first and most difficult thing is the runners. We will make them metal - it’s easier that way. Stainless or ordinary carbon steel will do. It is better to make the runners forged flat from a solid sheet of metal, but there is also the practice of using pipes. But to bend them you will need helpers.
- When the runners are ready, we move on to the base - the crossbars and racks, which are located on both sides. They can be made from pipes or profiles. All parts will need to be welded.
- An important part of the sled is the brakes. When the runners are ready, we make them in the simplest way - block runners in the form of rubber with a lever. This will be both the running brake and the parking brake.
- We weld metal plates to the front part, onto which the shafts will then be attached.
- When the chassis is ready, we make the body of the sleigh out of wood - this is how your imagination will work. Of course, drawings are made first. Afterwards, the bottom and inside can be covered with plywood and even a soft material can be attached on top for convenience, for example, leatherette or felt.
- Lastly, we attach the wooden shafts and that’s it – the sleigh for the horse with your own hands is ready!