In autumn, winter, and most of spring, animals are constantly indoors. Their waste products emit a dangerous substance - ammonia. In addition, the concentration of carbon dioxide in the barn is significantly increased. Agree that constant ventilation is not a solution, especially in twenty-degree frost. But ventilation in an animal shed is no less important than heating.
Drafts do not have the best effect on the health and offspring of animals. At the same time, you can’t do without air circulation. Therefore, in addition to insulating the building, it is also necessary to take care of the ventilation system. The latter must ensure normal microclimatic conditions, including air temperature, cleanliness and freshness.
In this article, we examined the basic rules of ventilation in animal sheds and provided standard values for temperature and humidity indicators for rooms in which animals are kept. We also described the procedure for arranging an effective air exchange system, providing instructions with visual photos and useful videos.
The importance of the microclimate in the barn
Often, owners do not bother creating optimal conditions in the barn. In the best case, holes are made in the wall in the room.
But the importance of oxygen indoors cannot be underestimated, because animals must live in an insulated and well-ventilated barn. During the construction of which it is advisable to use sawdust, hay or straw. Materials of natural origin perfectly absorb and retain moisture.
Maintaining proper air exchange reduces the incidence of disease in animals, and improves weight gain and the number of offspring.
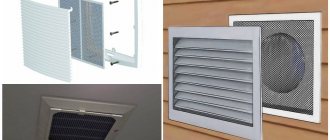
A grill should be installed on the ventilation openings. A device made of metal or plastic will help protect against rodents. Using the valve installed inside, you can adjust the supply of fresh air in winter
In the warm season, you can prevent the appearance of a musty smell in the room and the spread of mold through ventilation.
In winter, it is not advisable to open doors and windows. After all, the temperature should be maintained within +18-+22 degrees Celsius. Deviation of indicators from the norm increases the risk of colds.
Making a deflector for a ventilation riser
It is installed on a ventilation riser rising above the roof. The deflector works as follows: it cuts the wind directed in its direction, which leads to a decrease in pressure inside the device and increased draft in the exhaust duct.
Making your own wind turbine is inexpensive, but the effect is impressive. Install it on the roof. Before you start making it, you need to calculate the dimensions.
To calculate the height, the diameter of the ventilation pipe is multiplied by 1.7. By multiplying the diameter by 1.8, you get the width of the hood, and by multiplying this parameter by 1.3, you find out the required width of the diffuser.
The diagram shows typical structural components and standard proportions of a diffuser: pipe diameter (d), diffuser diameter (d1), hood circumference (d2), height (H)
Having calculated the dimensions, they are applied to cardboard and patterns are cut out. Next, the development of the cap, sketches of the diffuser blanks, cylinder and racks are transferred to a metal sheet or plastic. Using scissors, cut out all the parts and connect them using a special gun. All that remains is to install and secure the deflector.
You can also make a rotary valve yourself. To do this, a frame is welded from the corners. Holes are drilled on opposite sides of the frame and the axle is threaded through them. Bushings are made from pipe sections and welded.
A locking plate is made from a steel sheet according to the dimensions of the pipe. It is inserted into the frame and fixed to the axis by welding. To control the damper, a wooden handle is attached to the axis. To prevent the damper from closing spontaneously, a limiter is provided.
The disadvantage of such a ventilation system is the very fact of the presence of pipes in the room. From their surface, as well as from the perch, you will have to periodically scrape off droppings.
Typical mistakes during construction
The barn can be a free-standing building or attached to the house. As a rule, premises are built on the principle of “how to save money.” They often erect it independently and quickly.
You can prevent the spread of mold spores by using ventilation holes. The so-called vents should be placed around the entire perimeter of the barn
There are several main problems with such an object:
- Cheap foundation . Blocks and tires with concrete are used as the basis of the room. In the best case, they make a strip foundation. There is practically no waterproofing and insulation of this part of the building. And this causes free transfer of cold and moisture from the soil into the room.
- The floor often remains earthen . If you don't raise it a little higher, the air inside will be cold in winter.
- There is also no external waterproofing or wall insulation . Or they do it in the simplest way and make big mistakes. As a result, significant costs will be required for heating, and the building cools down very quickly.
- Insufficient natural light or its complete absence. One small window is made in the barn. And the importance of sunlight is difficult to overestimate, because ultraviolet radiation repels mold.
The presence in the building of all the listed defects or some of them leads to an increase in the level of humidity, disruption of air exchange, which is manifested by the complete absence or lack of fresh air, severe cold.
How to build a rabbitry
Housing for long-eared pets can be created using a frame-and-plank structure. Such a barn is not large in size, but inside it should be divided into zones or separate cages for furry animals should be installed. It is better to keep rabbits one at a time to control the breeding process. For females with cubs and ungrown young animals, a more spacious corner with insulation and artificial light is allocated.
Video - Construction of a rabbitry
In general, the construction of a wooden rabbitry resembles the process of constructing a poultry house described above. But in this case the room should be larger and higher. It is more convenient to arrange the cages inside in two rows to save space. Therefore, for 10 animals you need a barn with dimensions of 3x5 m and a height of 2-2.5 m. The building needs a stable foundation on a reinforced frame filled with concrete. A timber structure covered with edged boards is installed on it.
Tips for a Rabbit Shed
Shred cages are installed inside the rabbitry: adjacent cells with a front mesh wall. Most often they are installed in several tiers - two or three. Feeders and drinking bowls are hung on the front part.
Rabbit barn
Destructive consequences for the building
The listed violations will directly affect the utility unit:
- High humidity and regular temperature changes, especially if the structure is built from wooden materials, will accelerate the destruction of the barn. The finishing will also suffer, of course, if it was done. Unfavorable climatic conditions lead to damage and shedding of building materials. It will be necessary to carry out restoration work.
- The spread of mold also leads to the destruction of the room. Disputes can spread to other premises, including a residential building.
Insufficient air exchange causes the accumulation of gases from manure. And this is fraught with the creation of an unpleasant odor, which is extremely dangerous for human health.
Mold on the walls and ceiling increases the incidence of illness in animals. In addition, cows’ milk yields are reduced, calves and piglets gain worse weight, and the productivity of other animals decreases
If part of the shed is used as storage space, the property can quickly deteriorate.
This especially applies to wooden products, in particular firewood and furniture, and metal objects that are prone to rust. Fabric will also be damaged, for example, old clothes, which are often stored in sheds.
Preparatory work
Before working on the ventilation system, it is necessary to build a good-quality barn that is convenient for livestock. Many people are used to making rooms anyhow. A simplified approach to a serious matter, the desire to save on everything leads to serious problems:
- excessive crowding;
- lack of light and heat;
- increased air humidity;
- unpleasant odors.
All this can be avoided if you plan and build a modern barn without haste, taking into account the number of animals.
Ventilation measures may be unnecessary if the room is not insulated. To achieve this goal, dry sawdust, peat, hay, and straw are used as bedding. Quicklime is placed in the corners to absorb moisture. In order to reduce the level of dampness, heaters are installed near the suction openings.
Important: requirements for the construction of premises for animals differ significantly depending on the climatic conditions of the regions.
Standards and principles of ventilation design
In a non-residential area where things will be kept, the ventilation system should be a multiple of 1. This means that within 60 minutes the air in the barn should completely change. Ventilation according to this technology must have a performance that exceeds the volume by 15-30 points. If items that become unusable due to high humidity levels are stored inside, the circulation rate should be increased by one and a half or two times. We discussed warehouse ventilation standards in more detail in this material.
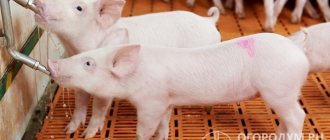
In the case of small private farms, when various animals are kept indoors - from bulls to sheep, the air exchange rate should be 4. This indicator can also be used by owners of mini-farms, where there are only two or three cows or ten rabbits.
But for a large number of livestock, creating optimal conditions involves not only focusing on the air exchange rate . temperature and humidity are important . The optimal humidity level is about 80. The coefficient can be determined using a psychrometer.
The level of indicators will differ for different animals - for example, the standard temperature for keeping cattle is 8-10 degrees with a humidity level of 70%. You can read more about barn ventilation in our other article.
Norms of microclimatic conditions, including temperature, relative humidity and gas concentrations for keeping cows in the autumn-winter period
Estimated values of air temperature in premises for keeping sows and boars, young animals, maximum and minimum levels of relative humidity
The data presented are used in large livestock farms with modern ventilation and heating systems. In an ordinary shed on a summer cottage, creating similar conditions will be much more expensive and difficult.
Arrangement of natural air exchange
This option can be called the simplest and cheapest, but also the least effective. After all, natural ventilation largely depends on the location of the building, as well as weather conditions.
You can arrange it as follows:
- Air flow is provided through a gap under the door or window. The ventilation system may also include a supply valve located at the bottom of the wall or a grille in the door.
- As a hood, it is advisable to use a pipe leading outside through the roof or wall under the ceiling. The external opening should be located above the ridge of the roof. To improve traction, a deflector should be installed on top of the hole.
But the natural ventilation scheme is not suitable for all rooms. In some cases, it will only make problems worse.
It is undesirable to choose this method of air exchange in the following cases:
- If the shed area is more than 30 square meters.
- Around the building there are taller buildings or branchy trees growing. Exhaust ventilation will not work well if the area where the utility yard is located is in a lowland.
- There is no foundation or it is not waterproofed or insulated.
- There is a high level of humidity indoors. With natural ventilation, humidity will increase even more during precipitation.
- Moisture condenses on the ceiling and walls of the building, which means that the problem can only be solved with the help of external insulation of the building.
It is also undesirable to use only this type of ventilation if animals will live in the room all year round or objects that are susceptible to mold will be stored.
Forced ventilation scheme
The mechanical system ensures forced air circulation regardless of weather conditions.
In sheds with a small area, you can arrange ventilation yourself: mount a fan on the hood, and leave the inflow natural.
In a room with a large area, for example, from thirty square meters, or if the building is very elongated, you can make several points of inflow and exhaust. It is very important to “get rid” of all corners where air stagnates.
In a barn for animals, making ventilation yourself is not so difficult:
- The inflow is provided through a window or a gap under the door. You can install a supply valve at the bottom of the wall or install a grille in the door.
- To remove air, a pipe is used, which is preferably installed through a wall under the ceiling or roof. A duct fan should be placed in the interior. The element should be covered with a protective cap on top.
The easiest way to independently install an exhaust pipe is to carry out the pipe through the wall under the ceiling. In this case, there will be no need to seal the hole through the roof. A forced exhaust hood should be installed in a small shed opposite the inflow, that is, on the opposite wall.
In fact, the only difference compared to a natural system is the installation of a fan in the exhaust pipe. For a small shed, a device with low power is sufficient; the price of such a unit will be about 5 thousand rubles. Even with continuous operation, electricity costs will be only a couple of hundred rubles per month.
Air exchange mechanism systems: natural or forced?
One of the main differences is the principle of creating air exchange - it can be natural or forced. Below we will consider each option and how to arrange it yourself.
Natural
In this case, air will flow in and out of the room due to the pressure difference. Fans are not used in this scheme. You can read more about the natural system separately.
The scheme is cheap (if you have to buy something, then the cheapest products, and you don’t need to spend money on electricity), but ineffective - air exchange largely depends on the weather, and it is difficult to regulate it. Suitable if you have a small house that is used only in the summer.
For inflow in natural ventilation systems the following can be used:
- Supply valves - wall or window.
- A transfer grille in the front door (suitable if the area of the house does not exceed 20-40 square meters, otherwise you will have to use a ventilation grille that is too large).
- Windows with micro-ventilation (not very relevant for dachas, since expensive windows are rarely installed in seasonal houses).
- In the summer - just open windows or doors (but in the winter, when they are closed, you will still have to provide inflow in a different way).
For exhaust - either a stove chimney can be used (that is, nothing additional needs to be done if there is already a chimney) or an exhaust air duct. It is mounted at a point as far as possible from the inflow point (so that the air is drawn through the entire room).
The supply is installed as low as possible, the exhaust as high as possible, under the ceiling. If there are several rooms, there must be inflow points in each one and located opposite the door. The exhaust pipe can be discharged either through the roof, above the ridge, or horizontally through the wall.
Forced
In this case, both supply and exhaust will be carried out using fans. In this case, the air exchange is more stable and can be adjusted. Suitable for larger homes where natural ventilation is more difficult to achieve.
Otherwise, all the rules are the same as with the natural ventilation scheme - inflow points must be in each room and installed opposite the door. Exhaust hood - vented through a pipe either to the roof or through the wall.
There is another option - installing an air duct system. 1 pipe with 1 fan enters the room and branches: a section is inserted into each room through which air will flow.
Automation of ventilation systems in a barn
It is advisable to improve the ventilation system if there are always animals in the room or valuable property is stored.
There are several options for how to properly ventilate a barn:
- using a humidity sensor;
- using a temperature sensor.
If you configure the exhaust fan to start using a humidity sensor, then the device will turn off when the psychrometer reading is normal. And increase the speed if, at an acceptable level of air humidity, the fan operates at minimum speed.
For smaller sheds, it is not necessary to install a fan with a temperature or humidity sensor. Or at least it should be done when absolutely necessary
You can start or stop the fan, or change its speed using the temperature sensor. Especially if the building will be used to keep animals. In the summer, the fan will turn on or increase speed during the heat.
In winter, on the contrary, when the temperature in the room drops, the fan will stop working altogether or slow down.
There are several ways to maintain the temperature at the proper level:
- Ventilation units are combined with heaters - steam, water and electric.
- The heating and ventilation device is installed in a special chamber or under the guise of a monoblock directly in the room.
- You can also save thermal energy using heat recovery units built into the ventilation system.
- By installing supply and exhaust ventilation with heat recovery and recycling.
After installing ventilation, it is important to test it before use.
Failure to install mechanical fans can increase their noise up to 100-120 dB. The intensity of a properly adjusted system should average 57-80 dB
Advice from professionals
Any inexperienced technician can make typical mistakes when installing ventilation. If the design works in such a way that it is completely impossible to get rid of stagnant air or the room quickly cools down, it means that somewhere an oversight has crept in when drawing up the diagram. When planning and subsequent installation of the system, it is necessary to correctly arrange the flow of air masses and calculate the stability of the assembled structure.
It is not difficult to check the effectiveness of the ventilation system; to do this, you need to go inside and spend some time there. If during the elapsed period there is no lack of oxygen and no headache begins, then the ventilation is working properly. Otherwise, you will have to change something in the design. Thus, it becomes clear that ventilation of the chicken coop is designed to provide an influx of clean air and regulate the level of humidity and temperature.
To reduce energy costs, which will still appear, the design is equipped with sensors that perform automated control over air temperature and humidity. In this case, the ventilation system starts only when the climate parameters in the chicken coop change. This option is also ideal for chicken coops that have fermentation bedding as a floor covering, since bacteria generate a large amount of heat when processing droppings and food debris. Excessively high temperature in the room can negatively affect both the health of the chickens and the vital activity of microorganisms living in the coating.
Typical mistakes during installation.
- Ventilation holes are located on walls adjacent to each other. In this case, stagnation of the air mass forms on the side opposite the walls, since it cannot circulate at a right angle. If the chicken coop room has the shape of a rectangle, then it would be correct to place windows or holes on shorter walls opposite each other.
- Strong hum when fans are running. Before installation, devices should be checked for noise. Chickens are very sensitive to loud noises and when frightened, they can reduce egg production or stop laying eggs altogether.
- Weak building design. Very often, the flimsy ceilings of built chicken coops break due to the weight of heavy iron air ducts. This is typical for buildings made of wood that have, at first glance, a strong ceiling, but can completely rot after a few years. Therefore, it is advisable to fasten metal pipes to the rafters.
- Metal pipes must be insulated during the cold season with mineral insulating materials. Having excellent thermal conductivity, metal can quickly turn a chicken coop into a refrigerator, even with the valves closed. At the same time, the constantly forming condensate can freeze, thereby blocking the access to air.
In order for the ventilation system to properly perform its functions, that is, to provide the chicken coop with fresh air without creating drafts and stagnation, it is necessary to adhere to the conditions below.
- It is recommended to periodically clean the chicken coop of droppings, leftover food and dirty water. Cleanliness in the area where poultry is kept should be a priority.
- Regular checks for the presence of small rodents and their destruction are required. The presence of foreign inhabitants can cause disturbance to chickens and unnecessary air pollution. In some cases, we may be talking about the spread of various diseases.
Any chicken coop owner makes an individual decision about installing ventilation and airing systems. Many people do not even think about setting up a chicken coop until they encounter frequent diseases of the livestock or its mass mortality. Only when faced with an unpleasant situation do poultry houses begin to choose between natural or forced-air ventilation, subsequently constructing it without much effort.
To learn how to make ventilation in a chicken coop with your own hands, see the following video.
Recommendations for choosing the type of ventilation
Each type of air exchange has its own advantages and disadvantages; several factors should be taken into account before installation:
- The amount of fresh air entering the room - in the warm season, the flow increases.
- The influence of natural conditions on the ventilation system, including average annual temperature and wind direction.
- The location of the barn is in a lowland or on a hill.
- Dimensions of utility room.
- Number of livestock.
And only after finding out the climatic conditions and how the air circulates inside the building can you begin to install one of the types of ventilation systems.
In addition to animals, do you also have poultry on your farm? In this case, we recommend that you read our other article about ventilation in a chicken coop.
How to calculate the size of a pigsty?
In order to correctly design a future building, you need to decide on its dimensions. We will consider separately how to calculate the area and height of the barn.
Square
It is believed that one animal should receive about 3-5 square meters. m. So, if you need to build a pigsty for 10 heads, then its area should be at least 30-40 square meters. m. However, for a more accurate calculation of the area of the premises, it is advisable to take into account the age of the animals, as well as the way they are kept - breeding or fattening. Standard standards are given in the table:
| Livestock | Number of animals in the pen | Machine area | |
| with breeding maintenance | when kept for fattening | ||
| Boars | 1 | 8 sq. m | 8 sq. m |
| Sows: | |||
| single and pregnant up to 2 months | 4 | 3 sq. m | 3 sq. m |
| pregnant at 3 months | 2 | 6 sq. m | 3.5 sq. m |
| sucklings with piglets | 1 | 10 sq. m | 7.5 sq. m |
| Piglets: | |||
| young animals up to 5 months | 10-12 | 0.6 sq. m | 0.5 sq. m |
| breeding boars aged 5-8 months | 2-3 | 1.15 sq. m | — |
| fattening piglets aged 5-6 months | 20 | — | 0.7 sq. m |
| fattening piglets aged 6-10 months | 15 | — | 1.0 sq. m |
For example, let’s calculate the optimal dimensions of a pigsty for 100 heads. Let's say there are 5 sows, 90 piglets, 1 breeder boar and 3 breeding pigs in the herd. Piglets are expected to have 2 farrows per year, so they need to be kept in pens of different sizes. Based on these data, the calculation is made in the following order:
- Calculate the area for each category of animals:
- for sows with piglets – 5x10 sq. m = 50 sq. m;
- for a boar – 1x8 sq. m = 8 sq. m;
- for older and younger piglets – 45x1 sq. m + 45x0.5 sq. m = 67.5 sq. m;
- for young pigs - 3x1.15 sq. m = 3.45 sq. m.
- Add all the obtained values – 50+8+67.5+3.45 = 128.95 sq. m.
- Calculate the length and width of the area used for the machines. Let’s say that machines with a depth of 3 m will be located in 2 rows, and passages will be organized along the walls - 2 longitudinal and 1 transverse. To calculate the length of the pigsty, you need to divide the calculated area by twice the depth of the pen and add the width of the passages: 130/(3x2)+1.5 = 23 m. As for the width, the calculations are as follows: 3x2+2+2 = 10 m.
Thus, the optimal area of a pigsty for 100 heads is 130 square meters. m, length and width – 25 m and 10 m, respectively.
Here are examples of pigsty drawings:
Height
When determining the height of the room, you need to take into account the following nuances:
- if the construction is planned to be carried out without a ceiling with open beams, the maximum height of the walls is 2.6 m;
- if thermal insulation is laid under the roof for insulation purposes, the optimal height of the room from the walls to the beams is 1.8 m;
- if the ceilings are flat, they must be installed at a height of at least 2.2 m.
In any case, the height of the external walls of the pigsty cannot be less than 1.6-1.8 m, otherwise the air in the room will be poorly ventilated. The highest point of the ceiling should be at the level of 2.2-2.6 m. It is better to make the roof itself 1- or 2-slope.
How to correctly calculate the dimensions of a pigsty in order to make it from boards, learn from the video below:
Self-installation
Even a beginner can install an air exchange by following simple instructions, since ventilation in a shed is not difficult. To begin with, you need to place a ventilation duct in the lower part of the room. A pipe with a diameter of approximately 150 mm is suitable for this. Then a through hole is made in the wall using a hammer drill and a homemade air duct is installed.
A rodent protection grille is attached to the outside of the ventilation openings. A valve is installed inside to regulate the supply of fresh air in winter.
If a forced ventilation installation was chosen, you will have to spend more money, but you can achieve a better result. Its installation begins with the installation of air pipes. Since this type of air supply complicates the installation of the fan, you need to install the power supply and choose how to turn the system on and off. The equipment must be installed and connected to the electrical network.
After installing the hood, it must be checked. To do this, you can use an ordinary sheet of paper. It is placed near the ventilation hole and the effectiveness of the ventilation system is judged by the force of attraction to the hood. Ventilation of the barn is the most important component in maintaining the correct microclimate, which will ensure the health of the animals and save the nerves and money of their owners.
Wooden structures
Farms built from wood are common in Europe. Wood is a good material in terms of its thermal conductivity and the creation of a microclimate in the barn. One of the disadvantages of wooden barns is their fragility given the aggressive environment.
There is a prejudice that wood is a rotting material. But, if, with the help of properly organized ventilation and technical solutions, we ensure normal temperatures and relative humidity and regulate the time of their exposure, we can achieve sufficient durability of the barn. Moreover, wood does not need to be used in all parts of the structure.
There are various designs of wooden cowsheds; some are described in the report of the Vakola Agricultural Research Institute (Finland).
Read about the main barn designs and methods for creating them.
- The main structure is a rafter structure, creating a trapezoid in plan.
- The roof is high, as a rule, made of metal profiles to ensure the reliability of the frame.
- The design consists of the main elements: sides made of laminated veneer lumber with curtains, a light ridge above the feeders, vertical steel beams, a feeder based on a parallel, European principle.
3 by 3 rows
- The milking parlor is of a carousel, circular type.
- Calves are kept close to adults. There are also no partitions between the cows and the separation hall.
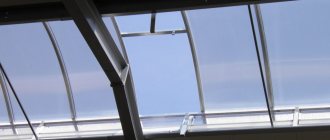
- Ventilation occurs through opening awnings.
- The sides are made of metal profiles or steel, the roof is tiled.
In 3 rows
Basically, it is developed for the joint keeping of young animals and dairy cows located in the same row, not in parallel. Expansion in this case is possible due to the waste compartment.
We invite you to read: Detailed characteristics and description of the East European Shepherd breed
What affects the calculation of the circuit?
The calculation of the scheme is influenced by:
- Room volume. The larger it is, the more productive the ventilation system should be. In rooms with large volumes, natural ventilation systems can no longer cope, and only supply air systems need to be used.
- Number of pigs. The more heads there are, the more oxygen they will need.
- Climatic features of the region. First of all, you need to take into account the average temperatures at different times of the year and the amount and frequency of precipitation (which can affect humidity). In cold regions, in addition to a ventilation system, it is imperative to install powerful heating systems. In regions with high humidity, it is necessary to either build a powerful ventilation system and/or install dehumidifiers in addition to it.
- Location of the pigsty. If the premises are located in an open area not in a lowland, you can use a natural system (if the livestock is small). In other cases (the room is protected from the wind by other buildings or trees, or is located in a lowland) - only a forced system should be used.
- Direction of the wind. The building should face the leeward side.
How to calculate?
The main criterion is the frequency of air exchange. It should be:
- in winter: up to 4-5 times per hour;
- in summer: 10-15 times per hour.
That is, in winter, the air in the room should be renewed 4-5 times in 1 hour.
To calculate the performance of a ventilation system you need:
- Calculate the volume of the room: multiply the area by the height of the ceiling.
- Multiply the volume by the maximum required multiplicity - in our case by 15.
- Ideally, make a small performance reserve.
Let's give an example of calculation: we have a pigsty with an area of 100 m² and a ceiling height of 2.3 m. We determine its volume: 100 x 3 = 300 m³.
Now we multiply 300 by 15 = 4500. This is how many “cubes” of air our ventilation should provide in 1 hour at maximum load.
Self-installation
Even a beginner can install an air exchange by following simple instructions, since ventilation in a shed is not difficult. To begin with, you need to place a ventilation duct in the lower part of the room. A pipe with a diameter of approximately 150 mm is suitable for this. Then a through hole is made in the wall using a hammer drill and a homemade air duct is installed.
A rodent protection grille is attached to the outside of the ventilation openings. A valve is installed inside to regulate the supply of fresh air in winter.
If a forced ventilation installation was chosen, you will have to spend more money, but you can achieve a better result. Its installation begins with the installation of air pipes. Since this type of air supply complicates the installation of the fan, you need to install the power supply and choose how to turn the system on and off. The equipment must be installed and connected to the electrical network.
After installing the hood, it must be checked. To do this, you can use an ordinary sheet of paper. It is placed near the ventilation hole and the effectiveness of the ventilation system is judged by the force of attraction to the hood. Ventilation of the barn is the most important component in maintaining the correct microclimate, which will ensure the health of the animals and save the nerves and money of their owners.