Advantages of a self-made granulator
Hand-made production of this device allows you to:
- make the device mobile (by attaching wheels to its base);
- make a granulator depending on your requirements, taking into account the number of livestock kept and the amount of feed they need;
- significantly save financial resources, taking into account the cost of purchasing a factory unit and the cost of purchasing any parts not available at home for home-made assembly;
- get the opportunity to independently manufacture a small-sized device, which will contribute to significant space savings in the room where the granulator will be located;
- get the opportunity to increase or decrease the productivity of the granulator, depending on the needs of your own livestock farm;
- get the opportunity to use the granulator not only for its intended purpose, but also as a machine for the production of wood fuel;
- Even a meat grinder can be converted into a granulator.
Feed granulator is a very convenient device
Industrial manufacturing technology
Let’s immediately answer the second burning question: it is possible to produce pellets at home, but it is very difficult. The fact is that solid granules with a diameter of 6-10 millimeters and up to 30 mm in length are obtained by pressing under high pressure without the use of binding (adhesive) additives. This process is called granulation, and special presses used in factories are called granulators.
The cost of such devices is quite high, but they are only an integral part of the production line. But let's talk about everything in order. So, the following types of raw materials are used to make pellets:
- various wood waste - shavings, sawdust, slabs and so on;
- stalks of cereals and other agricultural crops - straw;
- husks of buckwheat, sunflower, wheat seeds;
- peat.
Reference. The highest quality “white” granules shown in the photo are made from birch, coniferous and other types of wood. In second place are straw products, and in last place are cheap agropellets made from the husks of various crops.
In a factory, pellet production looks like this:
- Primary raw materials are sent to a crusher, where they are processed to a fine fraction.
- The next stage is drying. Raw material particles are brought to a moisture content of 10% in drum or aerodynamic dryers.
- The main stage of the technological process is granulation. The mixture is treated with steam and forced through many calibrated holes under a pressure of about 300 atm.
- The resulting fuel pellets are cooled and supplied for packaging in bags or special vehicles (depending on the order and delivery method).
As mentioned above, binders are not added to the raw materials. The particles stick together into one mass thanks to natural glue - lignin, which is released when the material is strongly compressed. The result is a highly efficient fuel for boilers with a heat output of 4.5 to 5 kW per 1 kg, a humidity of no more than 8% and a maximum ash content of 4%.
Note. The ash residue when burning high-quality white granules is not higher than 0.5%. This means that the amount of waste from 1 ton of such pellets will be only 5 kg, and the firebox and heat exchanger of the boiler are practically not covered with soot.
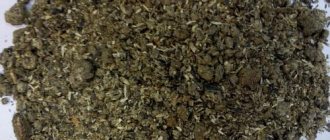
This is what agropellets look like
How to make a granulator for feed and grass from a meat grinder with your own hands
The algorithm for making a granulator from a meat grinder from LPH Rabbit is quite simple. If you have certain skills in handling a lathe, grinder and welding, you can make a unit quickly and without difficulty:
- At the first stage, you need to disassemble the meat grinder and rid it of unnecessary parts. The rotation handle, lid and grill are not needed; they can be removed and set aside. If the meat grinder has legs, holes are immediately made in them using a drilling machine to attach the unit to the workbench.
- Internal ribs in the meat grinder body can interfere with the installation of the matrix; they are usually ground off. A new cover is then made from an iron blank to hold the perforated disc at the outlet. To twist, a 6 mm thick wire is welded onto the part or grooves are cut using a grinder.
- On a lathe, a matrix is turned from a metal blank, the size of which is suitable for the neck of the meat grinder. The thickness of the blank must be at least 2 cm. Holes for pressing are drilled at an equal distance from each other, with a small cone-shaped narrowing in the lower part from the inside.
- The screw from the meat grinder needs to be improved. On one side, a hole is drilled in it for the screw holding the pellet knife, and on the other, a groove is drilled for attaching the rotating pulley. When assembling the structure, it is necessary to ensure that both the wheel with a belt drive and the matrix fit against the auger as tightly and accurately as possible. There should be no unnecessary gaps between the parts that cause backlash.
- After all the main parts of the granulator have been manufactured, you can begin assembling the unit. A screw is inserted into the body of the meat grinder, the matrix with holes is pressed against it, and then the two parts are connected using a screw with a knife on it. Then put a cover on the outlet hole and screw it tightly to secure all the elements.
- On the opposite side of the meat grinder, a pulley is put on a turned auger with a drilled hole and also secured with a screw. In fact, at this stage, a do-it-yourself granulator can be considered ready. All that remains is to install it on a workbench, connect the meat grinder pulley with a belt to the engine pulley and test run the device into operation.
For the first time, the granulator from the meat grinder is turned on without load at idle speed. It is necessary to check the functionality of the structure and listen for any extraneous creaks, crackling sounds or excess vibration. If the device operates smoothly and with little noise, a test batch of raw materials is poured into the upper part of the meat grinder and the quality of granulation is assessed in practice.
Device design
To assemble the mechanism yourself, you need to understand the structure of the granulator. The unit consists of:
- grounds;
- electric motor (power from 15 kW);
- matrices;
- gearbox;
- shaft;
- containers for raw materials and finished products.
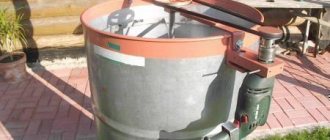
The matrix is the main part on which the speed and efficiency of the device depends. It comes in two main types – cylindrical (ring) and flat. The first is a drum with holes and rotating rollers. Under pressure, the raw material passes through the holes and is cut off with special knives at the exit.
The matrix of the second type (flat) consists of a hard disk fixed on the shaft. The principle of its operation is no different from the cylindrical one. Such devices are more modern and suitable for processing solid wood waste, which is not possible for devices with a ring matrix. In terms of operating speed, the second type of mechanism is also the leader.
Working principle of flat die granulator
There is another type of granulator, in which the raw material is pressed through a matrix using a rotating screw, similar to a meat grinder. They are suitable only for processing fine-grained, pre-ground materials, and because of this feature they are rarely used for wood waste.
It is recommended to purchase the matrix ready-made. Factory-made parts are sold as components for branded devices. In addition, their production can be ordered from private craftsmen.
Granulator drawings
Drawings and videos of a granulator from a meat grinder with your own hands show that this is a very simple device. Even beginners can handle its production. It is convenient to use a meat grinder as the basis for the unit precisely because it requires minimal modification. When creating a granulator, you only need to remove unnecessary parts of the device and secure some additional elements.
The advantage of the meat grinder is the presence of a ready-made durable screw mechanism
The dimensions of a homemade granulator are determined in accordance with the dimensions of the meat grinder. The main attention should be paid to the matrix; it should fit tightly and without play into the unit body. During the manufacture of the device, the conformity of all fastened parts to each other is checked. A pulley on one side and a cutting knife on the other must be securely attached to the auger.
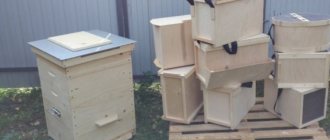
The do-it-yourself granulator is compact and suitable for installation on a table in the utility room
What tools and materials will be needed
To make a screw granulator from a meat grinder, you will need to prepare:
- workbench or frame on which the unit will be installed;
- lathe for metal processing;
- grinder;
- welding machine;
- metal mechanical meat grinder - Soviet or modern;
- 220 or 380 V motor;
- knife for cutting pellets;
- two pulleys with dimensions 1 to 2 - for mounting on the engine and on the screw mechanism;
- belt for connecting the motor to the meat grinder;
- drilling machine;
- metal blank for making a matrix.
Important! You will also need fastening elements - bolts and nuts, with which the knife, disk with holes, screw and pulleys will be connected to each other.
What can be granulated
Recipes for granulated food
The following are granulated:
- feed, hay, straw;
- sawdust, coal (in pressed form they are used for heating premises, and when they are granulated, the process of removing waste from lumber is simplified);
- peat, animal manure, bird droppings (used in briquettes as fertilizer);
- chalk, lime;
- polymer shavings (in the free state they are characterized by increased volatility).
Benefits of granulation
When compared with the finished product, granules or pellets have much more positive features:
They have the properties of solids - they do not lose their shape over a long period of time, do not compact, and do not stick at high temperatures and high humidity.
During pressing, extrusion and heat treatment, they acquire new properties due to physicochemical transformations. Polymer compounds (lignins) acquire a bound state, and a number of organic compounds begin to decompose.
They have a structure that can retain its properties for a long time - when the granulator is started, a shell is formed on the granules, protecting them from moisture, temperature, and sunlight.
The listed properties make it possible to effectively use the granulation process for the preparation of feed and fuel products from raw materials of plant origin:
Wood processing waste;
Forage crops;
Plant waste.
DIY granulator from a meat grinder (video)
Creating a granulator at home will allow you to save on purchasing a factory version of the device. You can use environmentally friendly fuel to heat your home without spending anything other than electricity when creating sawdust pellets. Since environmentally friendly fuel and livestock feed are in demand on the market, it is worth thinking about opening your own production. If you are farming, a granulator will help feed your entire livestock, and excess feed can be stored or sold.
Introduction
More and more people understand that granulated herbal mixtures are much healthier for animals, and granulated wood provides several times more heat than ordinary firewood.
Buying a granulator is not always possible, and then craftsmen have the opportunity to train their brains and make a home masterpiece, from which the soul will rejoice for a very long time.
If, after reading this, you decide that it is more profitable for you to buy a press, then contact me at “SUPPORT”. Today there are lines or separate presses both for home use and for small-scale production.
If you contact me, I will tell you which press is best for you to choose, we will select the productivity and even you will be able to visit a real pellet plant for FREE. More details about my services can be found in the “SERVICES” section. I also have an interesting, inexpensive book, which you can find out about in the “MY BOOKS” section.
Advice from professionals
Gearbox manufacturing
To make a granulator, you can use a homemade gearbox. One of the common manufacturing options: rear axle from heavy Ural or Dnepr motorcycles. The subordinate ratio of this element is 4.62, it is compact, so it can be placed vertically.
You can connect the engine to the gearbox using a cardan or an elastic coupling from the same motorcycles. The drive gear has a splined shank onto which a cardan or elastic coupling can be mounted.
The moment characterizing the granulation procedure
When the granulator is first started, the toothed press rollers begin to rotate relative to the matrix. The raw material passes between the rollers through dies under high pressure. Heating during pelletizing of pressed raw materials is provided by electric heating or dry steam. Or the materials used are heated due to friction.
The acquired characteristics of pellets after running in the granulator are influenced by:
Compression options;
Composition of components;
Dimensional data of the dies;
Pressure value;
With flat die
Elements
The main elements are:
The body must consist of two components: external and internal. In this case, the diameter must be chosen such that the matrix in the upper part of the structure can rotate freely. There should always be a small gap between the inner and outer housings.
Necessary materials
Manufacturing a feed granulator does not require expensive materials and spare parts.
To make a homemade granulator you will need:
steel or tin sheets;
felt-tip pen or marker.
If possible, it is better to use components made of high-quality or alloy steel.
Step-by-step instruction
First you need to prepare a disk twenty millimeters or more thick. It is important to remember: thickness affects the size of the granules and performance. Therefore, as the thickness increases, you need to choose a more powerful electric motor.
Make a hole in the disk, attach the gears to the shaft and attach it with a coupling perpendicular to the body.
The gearbox should be secured to the bottom of the device using bearings and a coupling. Then weld the ears to both parts of the body, having previously connected them with bolts.
Weld a frame from corners or channels. Install on the granulator itself. Place the rollers and matrix into the device.
Rigidly attach the product to the frame using bolts. Install the electric motor. After this, attach the gearbox to the output part of the rotating shaft.
After final assembly of the device, as a final touch, you need to apply metal paint if the case is not made of stainless steel.
The first start should be carried out only after the paint layer has completely dried.
Recommendations
A video of a homemade feed granulator from a meat grinder recommends paying attention to several points:
- It is not necessary to buy an electric motor for the device; a working motor from an old vacuum cleaner or washing machine will do. In domestic conditions, it is most convenient to use an element with a voltage of 220 V; it can be connected to any outlet. It is worth considering that a 380 V motor will provide the granulator with greater power and productivity.
- When making a matrix, the size of the holes is determined in accordance with the diameter of the part itself. For example, in a disk with a width of 20 mm, it is optimal to drill 3 mm holes. With a diameter of 25 mm, 4 mm holes are more often made. The larger the matrix, the wider the perforation should be.
Both the holes for the granules and the groove for the tip of the auger shaft must be ground on a lathe or by hand before assembling the structure. Any unevenness in the fastenings will negatively affect the quality and will lead to the structure vibrating more strongly. Rough holes for feed, in turn, do not allow achieving optimal granule density.
Setting up the granulator
As soon as the preparatory process and grinding in of the granulator matrix are completed, setting the parameters begins. They are influenced by the quality of raw materials and the specified characteristics of the granules. The optimal moisture content of the starting products is from 10 to 12%.
Adjusting the granulator rollers includes setting the gap size. It is important to remember that a small gap will create excess pressure, which will lead to rapid wear of the press rollers, shafts and drive mechanism.
After granulation is completed, the gap must be increased so that when switching on again, the moving components are not damaged. The gap is adjusted before each start to obtain the required pressure for the formation of optimal granule density. Thus, when adjusting the granulator rollers, the gap size should provide the pellets at the outlet with the desired shape and hardness. But most importantly, you need to choose high-quality raw materials and take into account the design features of the unit. So that the question does not arise why the granulator matrix is clogged.
Operating principle
The process of forming granules occurs by giving shape to crushed raw materials while passing through holes in the matrix. This complex cycle, previously common only in the chemical industry for the production of plastics, began to be used in animal husbandry relatively recently.
Device
The granulator requires a small number of components and spare parts.
In general, it consists of the following elements:
electric motor with a power of at least 15 kW;
containers for raw materials and finished product.
The main part is the matrix; the shape and size of the feed granules depends on its quality.
There are several types of granulators.
The most common include:
With a homemade matrix. This type is the most affordable and budget-friendly and does not require a large amount of material and spare parts. This type of device is highly reliable.
From a meat grinder. Manufacturing the product requires almost no resources, but the quality of the produced food will be an order of magnitude lower than in the previous version.
Which type of granulator to choose - everyone must determine for themselves, based on the needs of their farm.
Sawdust granules: production stages
A problem when making sawdust pellets at home may be the need for additional equipment. You can build a great DIY pelletizer, but it's important to remember the additional steps involved in pellet production.
When working with a granulator, you must follow safety regulations
Scheme of the stages through which sawdust passes before granulation:
- Coarse crushing. Sawdust and chips can be large and damp, that is, unsuitable for making pellets. Therefore, the first step will be crushing. At the exit, the size of wood waste should not exceed 1.25 centimeters per cube.
- The second stage is drying. Sawdust that was lying, for example, in the open air could be exposed to water. But even if the sawdust was stored in special bunkers, the humidity level for making pellets should not exceed 8-13%.
- The next stage is fine crushing. Typically, hammer type crushers are used. At the output, sawdust sizes do not exceed 1.5 mm and 4 mm for production low-grade pellets.
- Next comes the granulation itself. For better gluing, the sawdust is moistened. For soft wood, water is used, for hard wood, hot steam is used. Rocks with a high resin content bond best.
- The fifth stage is sawdust pressing. At this stage, granulation itself occurs.
- Now the sawdust needs to be cooled, since after the granulation process, due to pressure, its temperature can reach 80 degrees. At this temperature they crumble easily.
- Sawdust that has not been compressed is sifted out and, for convenience, the granules are packaged.
Considering the passage of all these stages, we can conclude that the process of making pellets at home is a rather labor-intensive process. However, when using sawdust that meets the moisture and size standards, only a pellet granulator can be used.
How the device works
To make your own feed granulator, a drawing is necessary as well as knowledge of the operating principle. The device works like this: raw materials are poured on top and fall into the matrix. Then the raw material is pressed by rollers into a special hole. The granules come out through a special hole in the body.
To prepare a small volume of feed, a design based on a meat grinder is used. Instead of rollers, it uses a screw to press the raw materials. The disadvantage of this type is that for falling asleep it is necessary to use only very fine raw materials, grass.
Forum about polymers PlastExpert
The largest independent platform for discussing the production and processing of plastics and elastomers in various ways. Recommendations from leading experts.
- Unanswered topics
- Active topics
- Search
- PlastExpertForum about polymers Miscellaneous/OtherQuestions to experts from beginners/Questions from beginners
- Search
- Unanswered topics
- Active topics
Adjusting the auger speed, why and when to use it?
Adjusting the auger speed, why and when to use it?
#1 Post by vitalik_f » 23 Oct 2014, 20:36
Re: Adjusting the auger speed, why and when to use it?
#2 Post by vodav » 24 Oct 2014, 02:25
Re: Adjusting the auger speed, why and when to use it?
#3 Post by vitalik_f » 24 Oct 2014, 20:42
Re: Adjusting the auger speed, why and when to use it?
#4 Post by Polli_mer » Oct 24, 2014, 10:00 pm
Re: Adjusting the auger speed, why and when to use it?
#5 Post by AAN » 25 Oct 2014, 14:09
Re: Adjusting the auger speed, why and when to use it?
#6 Post by Figaro » Oct 26, 2014, 00:01
Re: Adjusting the auger speed, why and when to use it?
#7 Post by Figaro » Oct 26, 2014, 00:03
Re: Adjusting the auger speed, why and when to use it?
#8 Post by Fishplast » Oct 26, 2014, 11:30 am
Re: Adjusting the auger speed, why and when to use it?
#9 Post by Lech » Oct 26, 2014, 12:51 pm
Re: Adjusting the auger speed, why and when to use it?
#10 Post by AAN » 26 Oct 2014, 14:13
Re: Adjusting the auger speed, why and when to use it?
#11 Post by Figaro » 27 Oct 2014, 13:26
Re: Adjusting the auger speed, why and when to use it?
#12 Post by AAN » 27 Oct 2014, 14:58
Re: Adjusting the auger speed, why and when to use it?
#13 Post by Figaro » Oct 27, 2014, 11:39 pm
Re: Adjusting the auger speed, why and when to use it?
#14 Message by Lech » Oct 28, 2014, 06:03
Re: Adjusting the auger speed, why and when to use it?
#15 Post by casper » 28 Oct 2014, 07:25
Re: Adjusting the auger speed, why and when to use it?
#16 Message by Lech » Oct 28, 2014, 07:45
Re: Adjusting the auger speed, why and when to use it?
#17 Post by AAN » Oct 28, 2014, 08:00
Re: Adjusting the auger speed, why and when to use it?
#18 Message by Lech » Oct 28, 2014, 08:32
Re: Adjusting the auger speed, why and when to use it?
#19 Post by Figaro » 28 Oct 2014, 13:00
Re: Adjusting the auger speed, why and when to use it?
#20 Post by Polli_mer » Oct 28, 2014, 4:49 pm